May 7, 1942
May 7 was thought to be the day of battle between the opposing American and Japanese fleet carrier task forces. It would have been had it not been for significant errors on both sides which caused the fleet carrier task forces to miss each other.
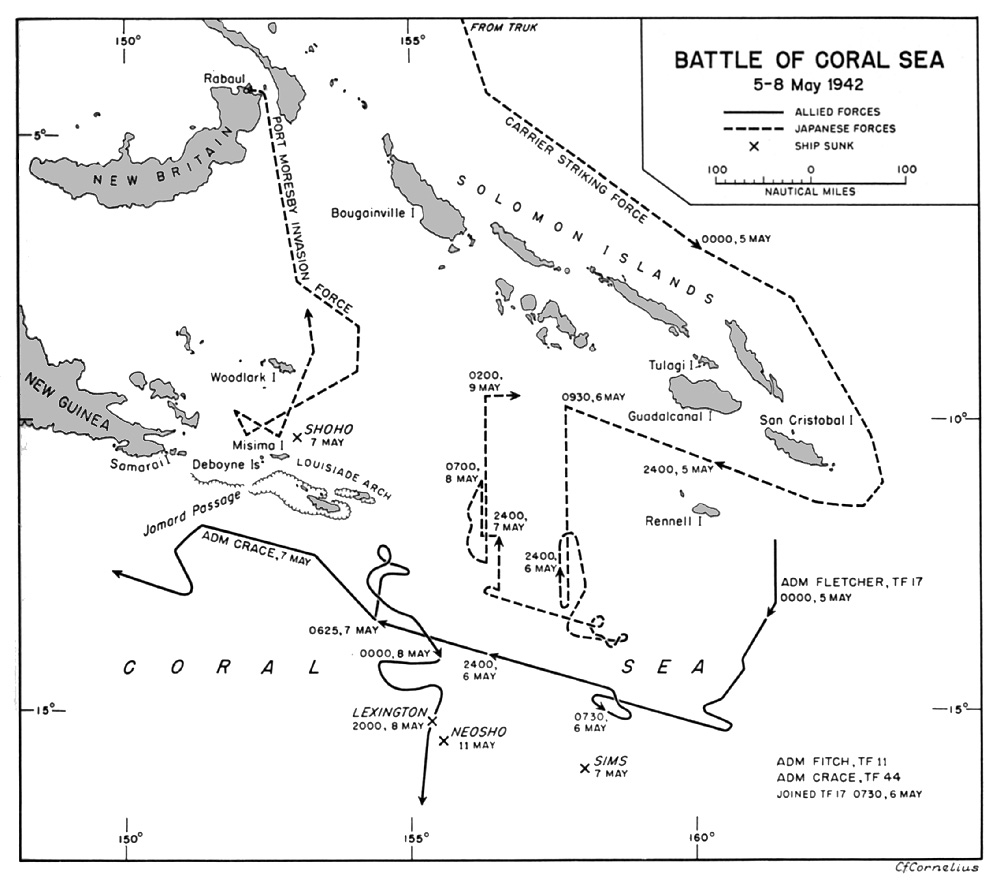
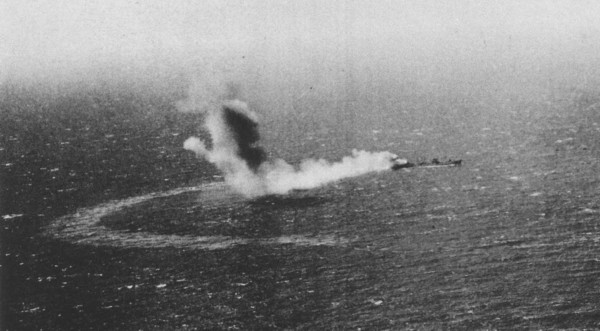
Instead, American carrier-based aircraft from USS Lexington (CV-2) and USS Yorktown (CV-5) sank the Imperial Japanese Navy (IJN) light carrier Shoho, which was providing air cover for the Port Moresby Invasion Force. This was the first Japanese aircraft carrier lost in the Pacific War.

Meanwhile, Japanese carrier aircraft from IJN fleet carriers Shokaku and Zuikaku sank destroyer USS Sims (DD-409) and heavily damaged and disabled oiler Neosho (AO-23), which were waiting in a position thought to be out of the battle area.
But before these attack efforts, TG 17.3 the Support Group, received a mission. Commanding Officer, Australian-born Rear Admiral John G. Crace, Royal Navy, had been chomping at the bit for months for combat action for the ANZAC Squadron. He chafed at previous operations in which the squadron was defensively positioned and saw no action against the enemy, such as during the Lae-Salamaua Raid of March 10, 1942. Now, with the enemy closing ever nearer to Australia, he would finally be given that opportunity on this May 7, 1942.

Augmented by destroyer USS Farragut (DD-348), the three cruisers and now three destroyers of TG 17.3 were ordered to detach from TF 17 and interpose themselves between Port Moresby and the Japanese invasion convoy heading for it, to accomplish an intercept and “…destroy enemy units proceeding through Jomard Passage.”
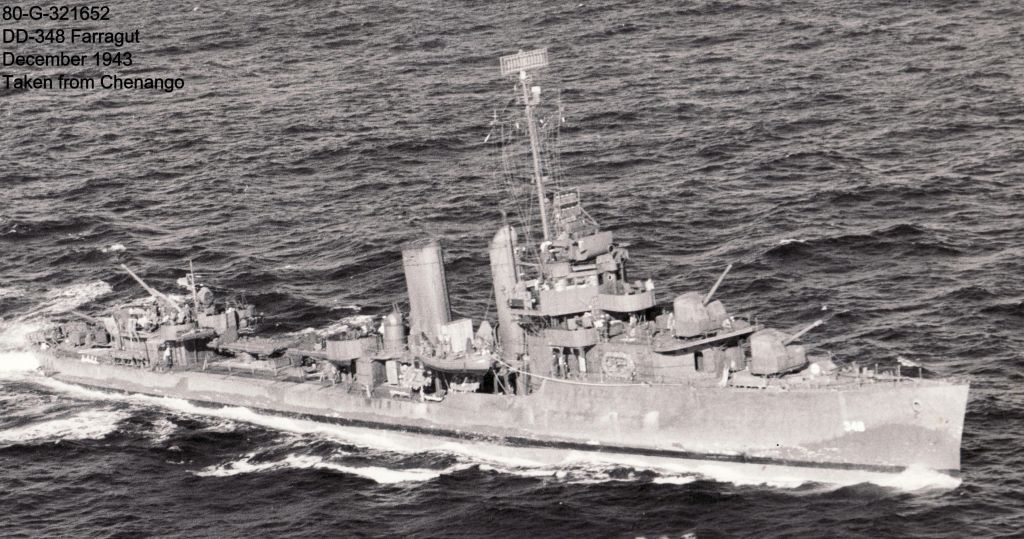
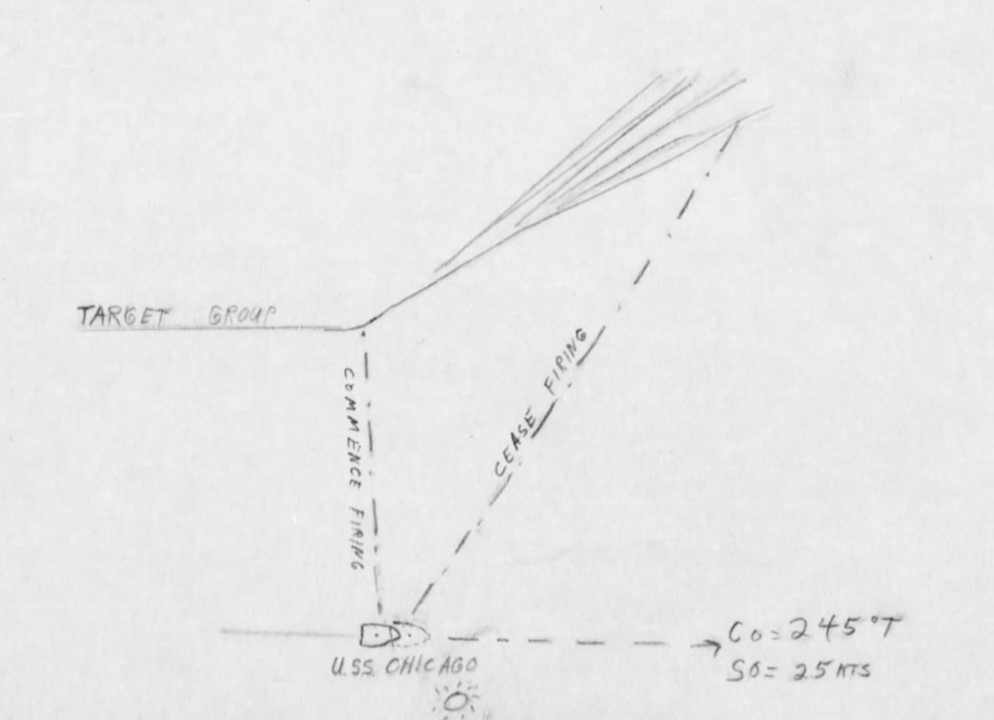
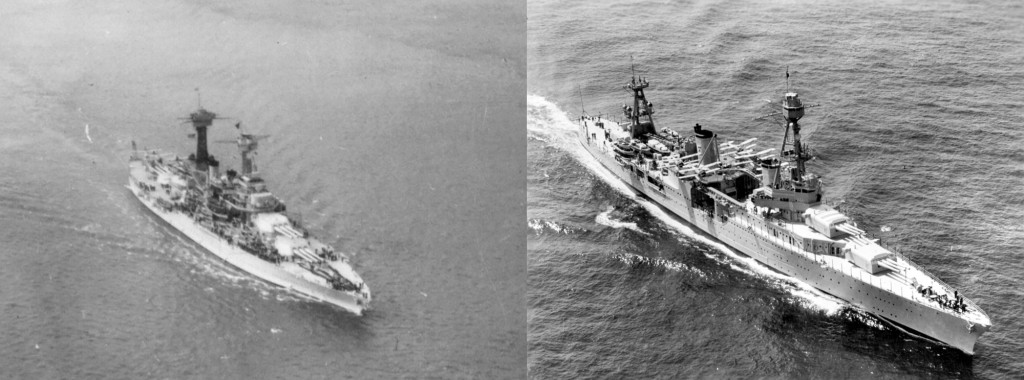
At 0655, the Support Group detached and assumed a course of 315 degrees True. At 1002, the formation shifted into an anti-aircraft disposition, described as a loose diamond formation with the flagship heavy cruiser HMAS Australia in the center, Chicago on her starboard quarter and light cruiser HMAS Hobart off her port quarter. The three destroyers were positioned with one 1,200 yards ahead of each cruiser; USS Perkins (DD-377) ahead of Australia, USS Walke (DD-416) ahead of Chicago and Farragut ahead of Hobart. Course was adjusted to a more westerly heading as the ships zig-zagged at a brisk 25 knots on a smooth sea with scattered nimbus clouds at 10,000 feet.
Admiral Fletcher was hedging his bets, fielding his forces in such a manner as to ensure accomplishment of primary mission to prevent the enemy from invading Port Moresby on the southeast coast of New Guinea. This was somewhat of a controversial move, in that the Support Group had no air cover from friendly fighters from either the TF 17 carriers or land-based aircraft. In addition, had enemy carrier forces been successful in defeating TF 17, little TG 17.3 would be easily handled. Still, Fletcher decided to divide his forces, which also weakened the screen of vessels defending his carriers. Whether the risk was greater than the benefit or not, Fletcher took it to prevent the enemy from accomplishing his objective.
Meanwhile, the lack of air cover would be a nagging issue for the Support Group on this day. Scant minutes after adopting an anti-aircraft formation, with the three destroyers leading the three cruisers, at 1010, an air contact was sighted. It would be the first of many in the next couple of days
By noon the Support Group had managed to make its way about 200 miles west of TF 17. Radar operators and lookouts scanned the skies for any potential threats. Three enemy twin engine bombers were sighted trailing the formation, one to each side of the formation and another astern, at low altitude and outside gun range, taking advantage of cloud cover to hide and then appearing again. Unfortunately for Crace and his group, it seems his ships were misidentified as including two aircraft carriers, and two groups of Japanese land attack bombers already airborne searching for TF 17’s carriers were given orders to attack.
Phase One
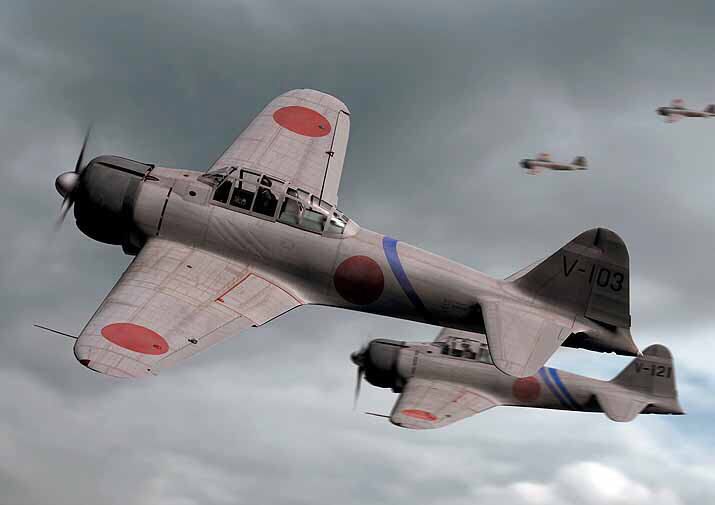
Radar contact was made at 1427 on a small group of aircraft bearing 135 degrees True at 25 miles (the ship’s anti-aircraft action report says 30 miles) and the ships once again assumed a higher level of readiness, appropriate for what was about to transpire. Soon, a dozen single engine aircraft hove into view to initiate Phase One of the battle that day. Chicago was unable to determine the type but they were Mitsubishi A6M2 Type 0 (Zero) fighters belonging to the Tainan Air Group, sent out as escorts for land attack aircraft (Rikujo kogeki-ki, abbreviated as Rikko) sent out to attack the American carriers in the Coral Sea. Having reached the limit of their endurance in an unsuccessful search for the carriers, the fighters were on the way back when they passed along the port side of the Support Group.
The aircraft passed close enough to draw fire, about 6,000 yards away off the port beam. After a minute of 5”/25 anti-aircraft fire, 39 rounds expended, the aircraft were seen to loosen their formation and head away from the ships with no aircraft shot down nor any indication of damage. Of note, the action was fought by the personnel at readiness Condition II stations.
At about 1445, a single engine aircraft approached, and the ships set Condition of Readiness 1. The aircraft was challenged and responded by dipping a wing, circling and lowering its landing gear. Identified as a friendly SBD Dauntless lost on its morning mission, it dropped messages on the decks of Chicago and HMAS Australia as the pilot inquired about the location of the nearest friendly airfield. By 1450 the aircraft flew on and the ships lowered their readiness condition. (Note: This was a Yorktown VB-5 SBD Dauntless dive bomber flown by Ensign J. W. Rowley which had chased after enemy aircraft in the attack against Shoho and became separated from his formation. Due to Admiral Fletcher’s radio silence, the Support Group could not give him a vector to TF 17. Ens. Rowley was able to successfully force-land on the Papua New Guinea coast and he and his radioman/gunner eventually returned to friendly control.)
Phase Two
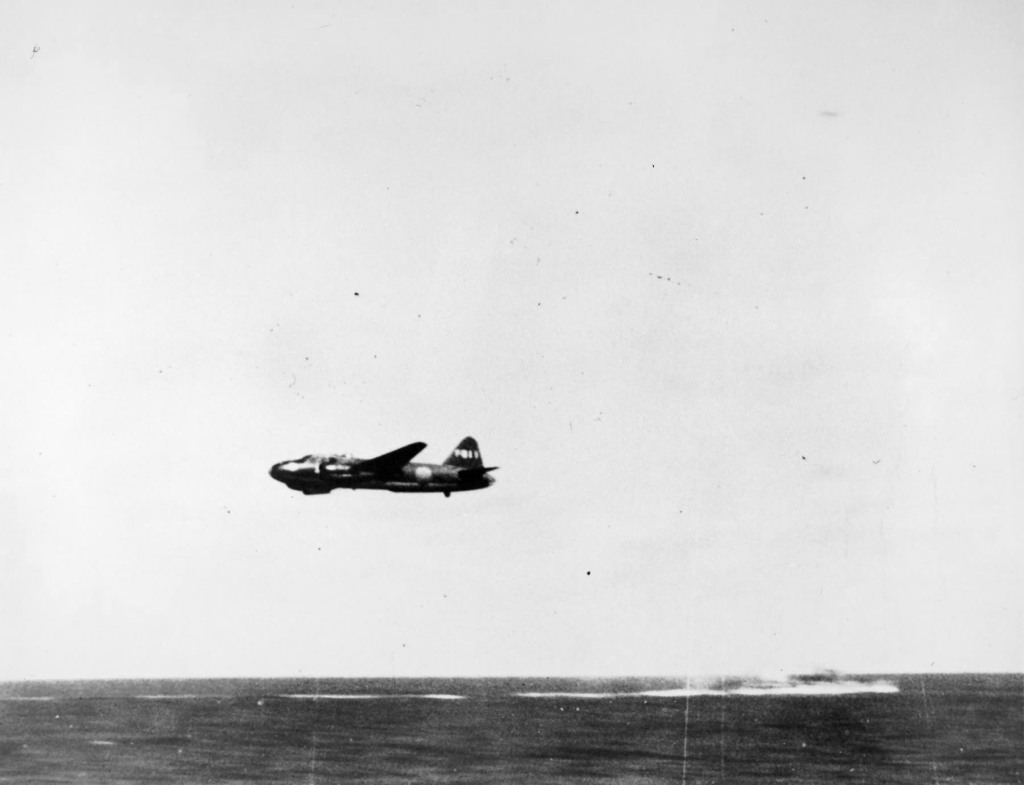
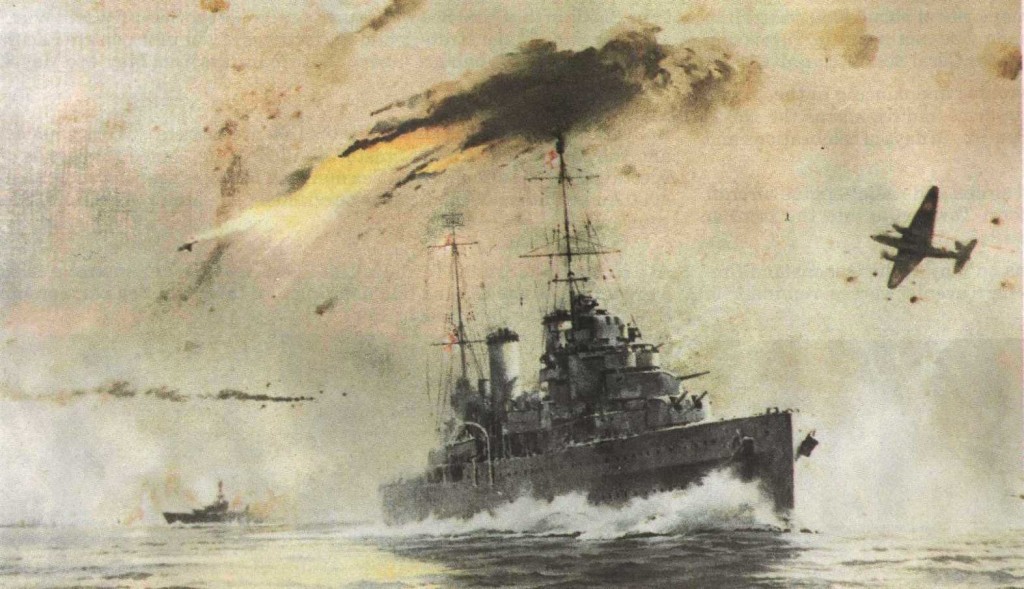
This was soon followed at 1500 by a bona fide attack on the Support Group by a force of 12 torpedo-armed Mitsubishi G4M Type 1 land attack planes (Rikko) of the 4th Air Group, the “BETTY” as the type was later code-named. This was the first of three wartime encounters with the Type 1 which Chicago experienced, and Phase Two of the battle.

Initially detected by Chicago’s CXAM radar 75 miles away, the aircraft were acquired visually with binoculars 15 miles away as they approached from the front of the ships at about 5,000 feet altitude and tracked for three minutes before opening fire against them. Unfamiliar with the Type 1 Rikko, the aircraft were identified as Mitsubishi Type 97 heavy bombers, “apparently modified with machine gun blisters on side of fuselage and no tail wheel visible.” In the heat of battle, Chicago’s crew also noted 14 enemy planes in the attacking formation, when in fact 12 attacked.
When they reached a point about 12 miles away they began a shallow, downward power glide. They reached an attack altitude of about 100 feet by the time they reached eight miles range and came at the ships centered on HMAS Australia in the center of the formation.

As they neared, Chicago observed eight planes approaching from 350 degrees relative bearing, toward the center of the formation – four more swung to the right to approach from 240 degrees relative, with two more reported that swung to the left aiming at the starboard bow. The time between the first tracking of the inbound aircraft and opening fire on them was three minutes, and firing began at a range of some 6,500 yards fine on the bow at 355 degrees relative.
Devoid of friendly air cover, the ships were on their own and made maximum use of available firepower against this low-level torpedo attack. The Gun Moll readied a hot reception for the Rikko. As the enemy attacked and passed through and abeam of the formation, all eight 5”/25-caliber anti-aircraft (AA) guns fired, as did the forward six 8”/55-caliber main battery guns, which laid fire in into the water short of the enemy planes to create waterspouts and affect their attack, an early war doctrine of US Navy heavy cruisers against torpedo plane attack.
In addition, the four quadruple 1.1”/75-caliber caliber automatic guns opened up as did the ships’ eight .50-caliber machine guns mounted atop the foremast and aft. Not to be left out of the fray, six .30-caliber Browning Automatic Rifles (BAR) fired on the enemy, likely by Marines of the Marine Detachment, as well as seven jury-rigged .30-caliber Browning machine guns from the aviation division aboard, weapons from the SOC Seagull floatplane unit embarked.

Two planes were felled by the AA fire of the formation during their initial approach, likely shot down by the screening destroyers ahead of HMAS Australia. The enemy aircraft lowered themselves a bit more to drop their torpedoes into the water, noted as low as 40 feet except for one plane that stayed between 100 and 150 feet.
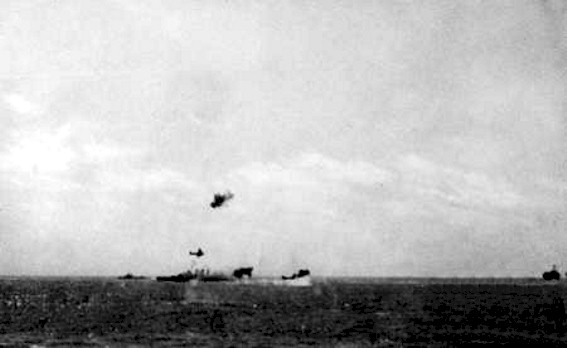
They dropped their fish at 1,000 to 1,200 yards from the various ships they aimed for, and hitting none of them amidst the ferocious defending fire as more of them fell. One Rikko, perhaps the leader, was set afire and exploded in mid-air. Another’s port engine and wing flamed up and it crashed.
Another was set afire in the port engine before its tail was shot off and it crashed. Two more were hit in their starboard engines and crashed. Another Rikko was hit in the starboard engine and limped away smoking heavily, and at least two other planes were riddled by the automatic weapons fire. Altogether Chicago’s crew assessed five enemy aircraft shot down with another possible and two-to-three more damaged. Japanese losses were actually four Rikko shot down in vicinity of the Support Group and another lost after it ditched from battle damage at Deboyne Island. Six others were damaged leaving only one of the 12 unscathed.

Chicago managed to dodge two or three torpedoes aimed at her. Up to six enemy aircraft, approaching as close as 70 to 100 yards away, strafed her with 7.7 mm machine gun fire which killed two Chicagomen. Seaman First Class (S1c) Anthony B. Shirley Jr., was killed when hit in the head by shrapnel from gunfire and died while at his battle station as a gun pointer on anti-aircraft gun No. 5 during the enemy torpedo-bomber attack. Baker Third Class (Bkr3c) Robert E. Reilly, was mortally wounded by gunfire to the head during an enemy torpedo-bomber attack on his ship while at his battle station (probably as a lookout) up on the searchlight platform on the mainmast. Bkr3c Reilly died from his wounds the next day and was buried at sea the same day, May 8, along with S1c Shirley.
All weapons functioned well in the attack, except for two 5” shell cases with oversize mouths which jammed two guns. Crews made efforts to clear the weapons and did so, but not before another high-level bombing attack against the formation developed, right after the torpedo plane attack.
In defense, in three minutes of firing Chicago expended some 127 rounds of AA Common ammunition, 12 rounds of 8-inch, 720 rounds of 1.1”, 1,800 rounds of .50-caliber, 120 rounds of .30-cal BAR and 1,500 rounds of .30 caliber, a veritable porcupine of AA fire aimed at the low-flying Rikko.
Phase Three
In Phase Three of this air action, enemy aircraft were detected 45 miles away. As they closed from the rear of the formation at about 14,000 feet altitude (other ship’s reports indicated 20,000 feet), the number estimated was up to 26 (other ship’s reports counted 19), identified as Mitsubishi G3M Type 96 heavy bombers from the Genzan Air Group, the Type 96 land attack plane later code-named NELL. This would be the first of two occasions in which Chicago battled against the G3M Rikko.

At 1526 the aircraft passed along the starboard beam of the group in a massed “V” formation (also reported as two “V’s”) before making a turn to the left to cross over the Support Group on their bomb run.

Both starboard and port 5”/25 batteries aboard Chicago took them under fire at about 5,500 yards, six guns in all with two still jammed; first the starboard battery fired on them for five minutes, then the port battery for four minutes as they crossed over the formation, ceasing fire as the aircraft were at 9,000 yards, expending some 184 rounds. Although no aircraft were shot down, four were reportedly damaged by the Support Group’s AA fire.
The attacking aircraft aimed at HMAS Australia in the center of the formation. A curtain of water erupted around the heavy cruiser and as she maneuvered smartly the bombs hit, completely obscuring her from view – many thought she was done for with such a concentration of weapons so close, Captain Bode aboard Chicago was reported as exclaiming “Goodbye Australia!”

But HMAS Australia proudly emerged from the foaming waters with only some splinter damage from several near misses; destroyer Perkins was hit by bomb splinters as well; the ships having dodged 33 250-kg bombs dropped by the level bombers.
Phase Four
As intense as this independent mission had been so far, yet another air attack developed shortly after the Type 96 Rikko level bombing – at 1527 another high-level bombing attack took place, this time from friendly air forces! A formation of three US Army B-17E Flying Fortress heavy bombers had been sent out against enemy ships, and apparently had not received word of the Support Group being where it was in the Coral Sea.

After an unsuccessful search for Japanese ships, the heavy bombers approached the Allied ships as they were under torpedo plane attack by the twin-engine Type 1 Rikko, which were mistaken at altitude by the B-17 crews as twin-engine US Army B-26 Marauder medium bombers attacking enemy ships. The pilot of one of the B-17s decided to attack and dropped his bombs, with five hitting near USS Farragut but missing about 200-300 yards off the starboard quarter where Farragut would have been had she not quickly changed her speed and course.
An angered Admiral Crace radioed TF 17 at 1526 that he could not complete his mission without air support. The admiral was vexed by TF 17’s radio silence (a prudent protective measure to prevent revealing his location to the Japanese) and was unaware of Admiral Fletcher’s current location or intentions as the battle unfolded. He also sent a nastygram to ComSoWesPacFor about the need for naval vessel recognition training by Allied aircrews.
The Japanese aircrews that attacked the Support Group reported they had sunk a California-type battleship, damaged another battleship and also hit a cruiser. Chicago with her tall foremast and mainmast was likely the vessel misidentified as a California-type battleship, an identification error that would happen more than once.
Meanwhile, the task group changed course to the south until after dark, in order to distance the ships from Japanese land and carrier-based aircraft, turning northward after dark to be in an intercept position. But the situation which the Support Group was deployed for, to repel enemy invasion forces encountered in the Jomard Passage, more or less took care of itself.
With the loss of light carrier Shoho and dedicated air cover, the Port Moresby Invasion Force withdrew from the area pending the outcome of the expected battle between the fleet carrier task forces on May 8. Orders were issued to posture two of the Japanese forces, the remains of Rear Admiral Goto’s Covering Group (minus carrier Shoho, four heavy cruisers and a destroyer), and Rear Admiral Kajioka’s Port Moresby Invasion Group (a light cruiser and six destroyers guarding the transports and other auxiliaries), to hold a position south of Rossel Island to fight a night surface action if Allied forces came in range.
By 1900 hours, it seemed the days troubles were past and at 1920, the Gun Moll went to Readiness Condition II. The ship’s war diary notes receipt of a ComSoWesPacFor estimate of enemy ships in the area north of the Louisiade Archipelago which indicated the Support Group could face one carrier, eight cruisers, 18 destroyers, two or more subs, a sub tender and 18 cargo transports or cargo vessels, formidable odds, though the carrier, likely a reference to Shoho, was already sunk.
May 8 off the Jomard Passage
The day the American and Japanese carrier task forces dueled, May 8, was relatively quiet for TG 17.3 as it lingered in an interposing position in case the Japanese changed their mind. Rain squalls were intermittent in the area, with low visibility through the morning hours, which likely helped screen them from the enemy. But still, enemy aircraft searched the Coral Sea and the ships had to keep their guard up and maintain situation awareness, especially without any friendly air cover.
At 1055 an aircraft was signed at seven miles distance. Challenged, it did not respond and withdrew. Radar detected an aircraft at 20 miles at 1250. It was sighted and HMAS Australia challenged it. The flagship failed to receive a response and opened fire on the aircraft, which withdrew.
In the mid-afternoon came a report from TF 17, that the first enemy air attack that day was repelled with what at the time seemed “negligible damage.” Indeed it was, before the sudden eruption of fires which ultimately doomed the damaged carrier USS Lexington (CV-2), with which Chicago had steamed many miles earlier in the war.

A late-afternoon report indicated an enemy carrier heavily damaged with two others in the area some 300 miles to the east of the Support Group. This was followed by a message that Task Force 16, centered on carriers USS Enterprise (CV-6) and USS Hornet (CV-8), would take command of forces in the Coral Sea upon arrival in the area. TF 16 had launched the famous Doolittle Raid on Tokyo on April 18, then headed back to Hawaii for a quick turn before being sent down to the Coral Sea, though too late to join in the battle.
Epilogue
But the action died down in Coral Sea by evening on May 8, as TF 17, including damaged carrier USS Yorktown disengaged. The Japanese invasion effort was postponed. Indeed, it was never attempted again as the tide of the war began to turn. This epic Battle of the Coral Sea was over, the first naval battle even in which the opposing ships did not sight each other, which was fought solely by aircraft against ships. Many lessons were learned by both sides, with little time to comprehend and apply before the next big battle at Midway a month later.
For Chicago and the others in TG 17.3, they would soon leave the Jomard Passage area. On the evening of May 10 the ships were detached from TF 17 and as TF 44 under ComSoWesPacFor control again, headed for a tanker off the Australian Coast to refuel and then remain near Australia.
On May 11, Chicago anchored at the refueling rendezvous along the Australian coast and took oil from a tanker in the afternoon. While this was underway, she received orders to proceed with Perkins to Sydney for “repairs and upkeep.” Among other things, she would be fitted with 20mm Oerlikon anti-aircraft cannons to replace her .50-cal machine guns. And, as things turned out, she would see battle again sooner than the distant Midway fight, in a fracas right in Sydney Harbor, another story to be told of the Gun Moll of the Pacific.
For USS Chicago’s “warmup” to this action in the Coral Sea, see: https://wordpress.com/view/gunmoll874518426.wordpress.com
