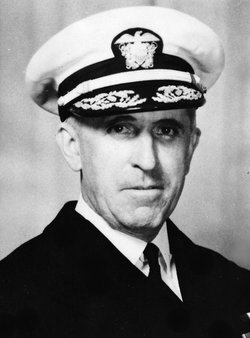
Life can sometimes present us with a defining moment. As the captain of the US Navy heavy cruiser USS Chicago (CA-29), Howard D. Bode faced such a time in the early morning hours of August 9, 1942 at the Battle of Savo Island.
Captain Howard D. Bode, USN (Uboat.net)
There at the ignominious battle he was presented with the opportunity to distinguish himself in battle as a hero, or as a goat (not to be confused with the modern acronym Greatest Of All Time). He received a surprising, “golden opportunity” to demonstrate his skill and prowess as the commander of a US Navy fighting ship. He was at the pinnacle of his naval career, or perhaps better described as the apex of it, in the moments before this battle began, eighty years ago.
Despite his known shortcomings as a petty martinet who had his crew walking on eggshells, he did have some things in his favor. Chicago had seen extensive operations in the war so far, as part of a carrier task force and then in the ANZAC Squadron. By all accounts, he handled the ship well at the Battle of the Coral Sea when attacked by numerous enemy aircraft. He was also able to operate effectively as a captain in the Allied squadron with Commonwealth commanders and captains. At Guadalcanal, Chicago served in a new role also, with a fighter controller aboard to direct the F4F Wildcats of the Combat Air Patrol that aircraft carriers covering the operation sent to protect the landing force.
The ship itself was well-armed and equipped, with early warning and fire control radars for her main and secondary batteries, and a new suite of 20mm Oerlikon anti-aircraft guns installed after Coral Sea.
On the other hand, there were some other things he had little control over, such as having to contend with bad lots of 5-inch starshells that would not function and illuminate properly when fired. Although Savo Island would reveal this problem at its worst, it wasn’t an unknown issue, as experienced in various battle practices held by the ANZAC Squadron/TF 44 in between Coral Sea and Guadalcanal.
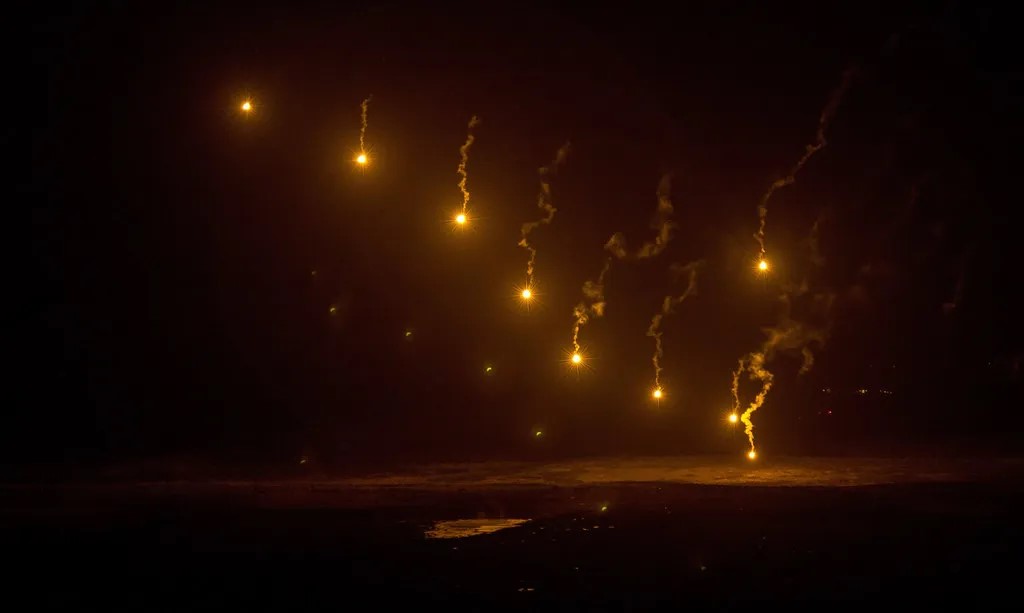
Starshells are designed to provide illumination. Chicago’s 5″/25-caliber secondary battery of eight guns utilized this kind of ordnance, though it failed spectacularly at the Battle of Savo Island. Here, 81mm illumination mortar rounds fired by U.S. Army Special Forces Soldiers assigned to the 10th Special Forces Group (Airborne) t in training at Grafenwoehr, Germany, Dec., 11, 2017, give some idea of the night visual effects provided by starshells. (U.S. Army photo by Staff Sgt. Jessica Nassirian)
And at Guadalcanal, he could not control the environment, within the geographic confines of the sound ringed by the islands of Guadalcanal, Tulagi, Florida and Savo. Nor the tempo of combat operations for the first two days of the campaign, very busy between the landings and supply and intermittent Japanese air attacks, with more anticipated. Everyone was exhausted from the tropical environment, the constant general quarters alarms and continuous combat operations.
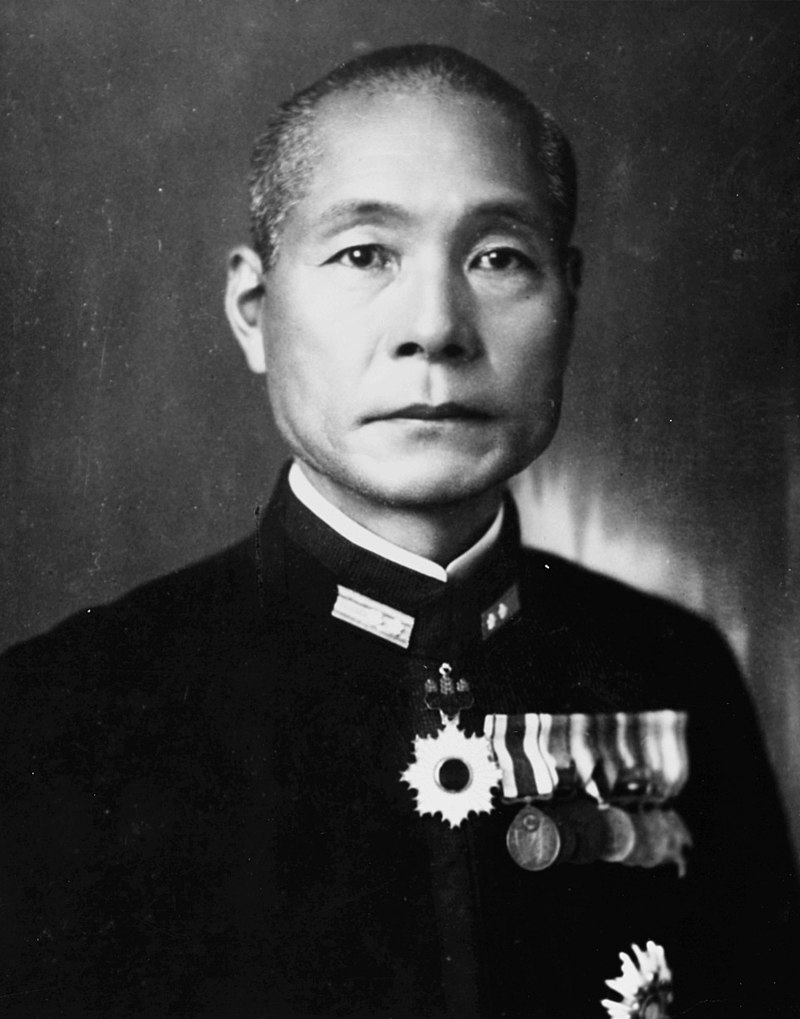
Nor could “King Bode” control the time of day such an opportunity could present itself, or the weather, or one other thing, the enemy. Or in particular, Admiral Gunichi Mikawa, commanding the Japanese task force of five heavy cruisers, two light cruisers and one destroyer rapidly approaching Guadalcanal on his flagship, the heavy cruiser Chokai.
Vice Admiral Gunichi Mikawa of the Imperial Japanese navy (Wikipedia)
Despite aerial reconnaissance reports of enemy surface ship activity, the details of the reports, and the interpretation of them by various commanders at Guadalcanal generally created a perception of no immediate threat to the landing force at Guadalcanal (one exception would be the commander of the destroyer USS Patterson (DD-392), Lieutenant Commander Frank R. Walker). But the threat was real and imminent as the Japanese cruiser force bore down on the unsuspecting ships of the landing force that night.
USS Patterson (DD-392) in San Pablo Bay off Mare Island, California on 08 May 1942. Navy photo DD 392 2513-5-42, from the collection of Vallejo Naval and Historical Museum. (NavSource)
Some of that interpretation took place late on August 8, when the commander of the screening force, Rear Admiral Victory Crutchley, Royal Navy, was called to conference and took his flagship out of the southern screening group in order to attend. He turned over command of the two cruisers and two destroyers to Captain Bode.
Rear Admiral Victor Crutchley in 1942 (Wikipedia)
Bode apparently changed nothing, kept his place in the formation behind heavy cruiser HMAS Canberra instead of assuming the lead of the formation. He issued no orders to the other ships in the southern group, nor the northern or eastern screening groups, which were unaware of the temporary change of command. He may have expected Admiral Crutchley, in command of the screening groups of the landing force to return soon, though the admiral had explicitly stated he might not be back that night.
Things seemed calm and quiet – eventually Bode turned in to his sea cabin to get some rest on that dark night of 8-9 August, exhausted no doubt. It was his bad fortune to be asleep when the Japanese struck, although one wonders whether that would have made any difference, given his lackluster response once awakened at the sound of battle.
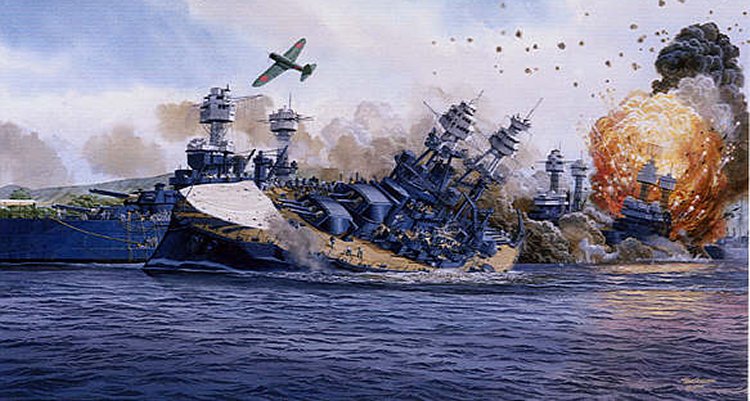
A 1/700 scale model of USS Chicago (CA-29) in her configuration at the Battle of Savo Island, by Vlad. Although Chicago’s own starshells failed miserably to illuminate, she herself was illuminated and silhouetted by flares dropped from Japanese floatplanes. ( Photo by Vladi’s Navy on Flickr)
Indeed, as Bode came to the bridge the fog and chaos of war took over and he was almost a bystander. Given the unknown threat attacking, he ordered star shells fired, but most did not function and Chicago was deprived of illumination of an enemy target for her guns. Furthermore, an enemy shell struck a leg on Chicago’s foremast killing two men and wounding a number of others, including perhaps the one man who could have helped Bode sort things out. His executive officer was felled by shrapnel in the neck from this shell.
Not only that, Chicago’s forward main battery radar which faced in the direction of the unseen enemy was prevented from functioning properly when a torpedo fired from the Japanese heavy cruiser Kako struck Chicago in the starboard bow.
Imperial Japanese Navy heavy cruiser Kako (Pinterest)
The shock of the blow and whiplash the ship received bent the small mast atop the foremast in such a way as to prevent the train of the radar. The gun crews tried to acquire a target with their optical sights in the main battery turrets, but without starshell illumination they were unable to detect a target on that dark night.
Robbed of situational awareness, Captain Bode had only the flashes of gunfire to go by. His secondary battery gunners were able to briefly acquire a target and took it under fire, scoring a hit on the Japanese light cruiser Tenryu. But other than that, confusion reigned over King Bode.
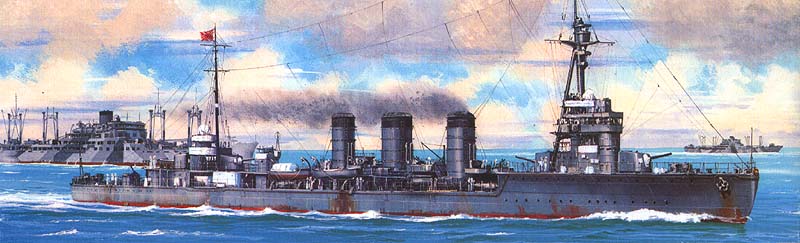
Painting of Imperial Japanese navy light cruiser Tenryu escorting a convoy (Deviant Art)
And in that moment, as the battle apparently shifted away from the southern group, whose responsibility it was to protect the southwestern flanks of the landing force and the vulnerable troops transports and cargo ships, at that moment, Captain Bode took the hero or goat test, and failed.
He failed to direct the ships of the southern group in battle. He failed to notify the other groups and ships in the landing force about the engagement with a hostile force. And perhaps worst, instead of steaming toward the flashes and sounds of the guns, and interposing Chicago in between the hostiles and the landing force, he ordered Chicago on a westward course, away from the battle area. It was an unfortunate decision for Bode, the other ships in which over 1,000 sailors were to die, as well as to the Marines recently landed on Guadalcanal and Tulagi and soon to be left to their own devices.
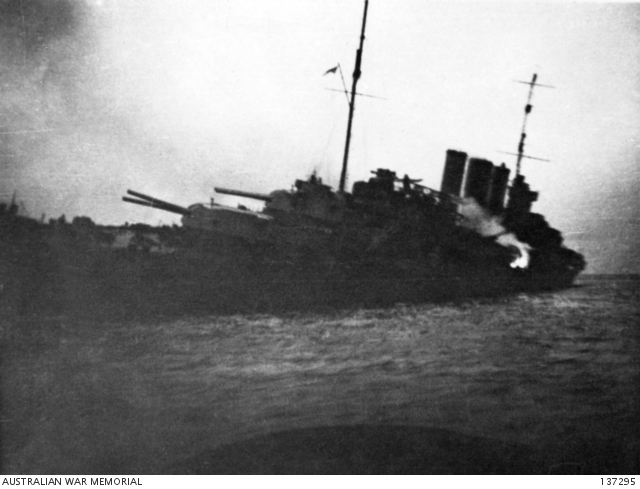
HMAS Canberra mortally stricken after the Battle of Savo Island, August 9, 1942 (Australian War Memorial)
With four Allied cruisers sunk in the battle, HMAS Canberra, USS Astoria, USS Quincy and USS Vincennes, the landing force lost its main protection, and later on August 9, departed the area, leaving the Marines on the islands without all of their equipment and supplies yet to be unloaded.
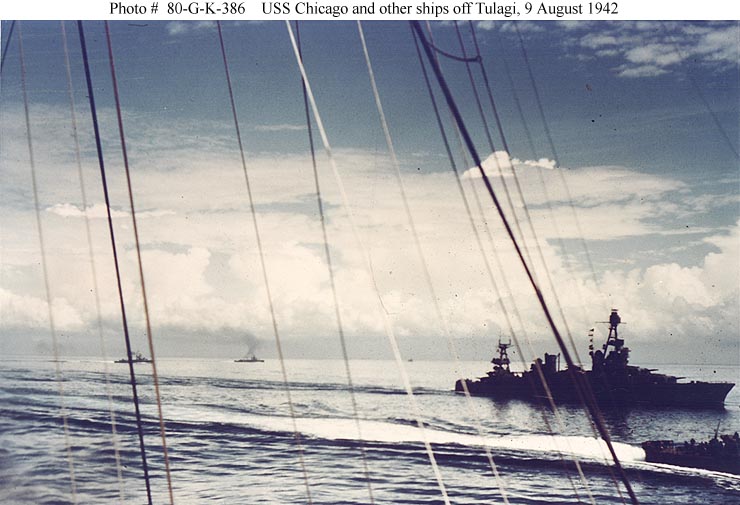
USS Chicago and several destroyers seen leaving Guadalcanal on August 9, 1942, after the debacle at Savo Island. (NavSource)
Given the disastrous outcome of this battle, in the first American offensive campaign of the war, the Navy appointed Admiral Arthur J. Hepburn, a former Commander in Chief of the U.S. Fleet, to investigate. He travelled out to the Pacific and interviewed surviving personnel involved, and ultimately wrote a report which identified a number of issues which contributed to the fiasco. But out of all the participants, only one, Howard Bode, was singled out and censured for failure to perform, and that was Howard Bode, identified in the official record as the goat at the Battle of Savo Island.
Some people have suggested Bode was merely a scapegoat, as there was plenty of blame to go around for the failures that terrible night. Indeed, Sandy Shanks wrote a historical novel titled The Bode Testament, published in 2001, which explores this idea at a hypothetical court martial.
Others however, including members of Chicago’s crew, believe the censure was deserved. A sense of shame affected some men, perhaps at the ship’s performance in the battle, and/or survivor’s guilt given the loss of four other heavy cruisers and so many crewmen. But perhaps the shame was more so in the ship’s westward run, away from the battle.
In any event, once Chicago returned to the US for permanent repairs after the battle, Bode was relieved of command, an occasion which was celebrated by many of the ship’s crew, not just for Savo Island but for experiencing all his unpleasant tenure aboard the ship. He was reassigned to shore duty in Panama, to the backwaters of the Pacific War. There he learned of his censure in the Hepburn report, which effectively doomed his career ambitions of making flag rank. Sadly, he took his own life in April, 1943, at 54 years of age.
Chicago’s damage and subsequent repairs in Australia, then in the US, took her out of the war for five months. But fate would bring her back to Guadalcanal and the closing days of the campaign. There she would meet her demise in the Battle of Rennell Island in late January, 1943. Perhaps it was another result, a long-range ripple effect, of the painful reign of King Bode.
USS Chicago was caught up in one of the strangest actions of World War II when Japanese midget submarines attacked Sydney Harbor on the night of May 31, 1942, in what became known as the Battle of Sydney. It showed the mettle of her men, as well as the flaws in her captain. The attack is well-written about in the book titled A Very Rude Awakening by Peter Grose (Allen & Unwin, 2007).
Chicago in Sydney
After the Battle of the Coral Sea, Chicago was ordered to Sydney for a brief refit at the Cockatoo Island naval base. She entered the Sutherland drydock at Cockatoo on May 16 and departed on May 25.
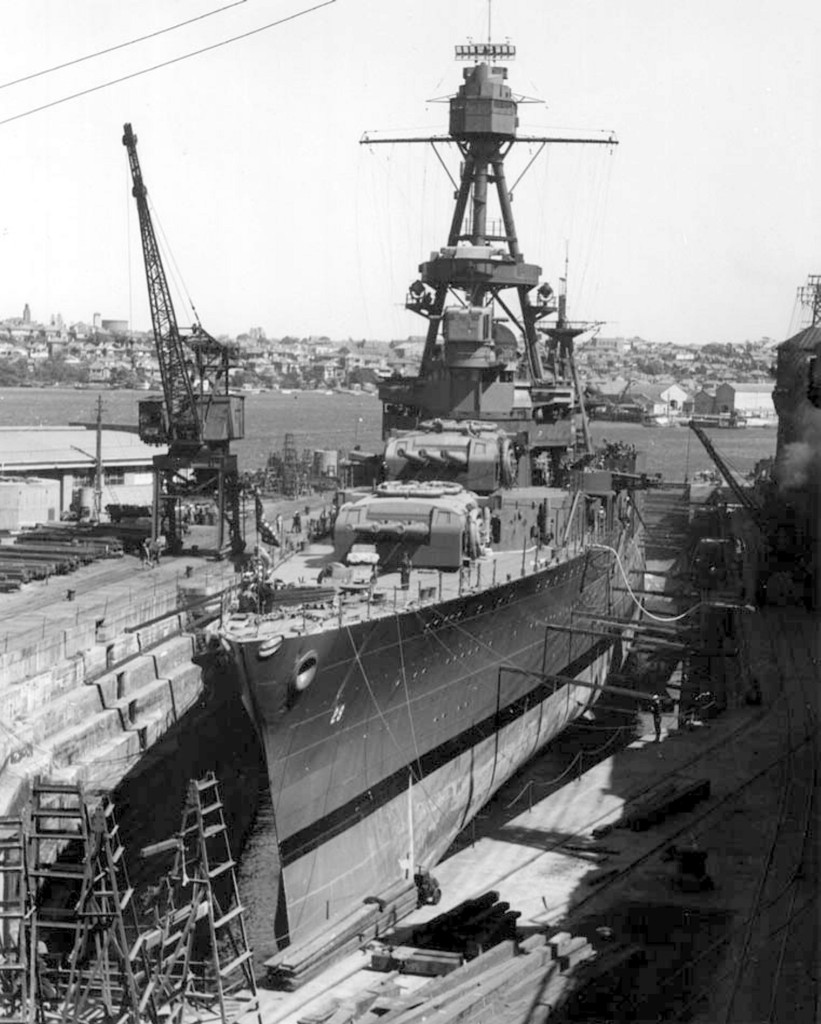
USS Chicago in the Sutherland drydock at Cockatoo Island naval base, Sydney, Australia, 1942. Several US Navy heavy cruisers (Chicago, Portland, New Orleans) received temporary repairs here from battle damage received in the Solomon Islands in 1942 which enabled them to return to the US for full repairs. (NavSource)
Aside from general upkeep, she also received an upgrade in light anti-aircraft armament with the fitting of 11 Oerlikon 20mm cannon to replace her eight 1930s-vintage .50 caliber machine gun in two batteries forward and aft.
This exquisite 1/700 scale model of USS Chicago (CA-29) by Vlad shows the locations of six of the 20mm Oerlikon anti-aircraft cannons fitted at Cockatoo Island in May of 1942. Three of the guns on the port side are visible with their dual square gun shields, abreast the forward stack, up on the bridge level and higher atop the foremast, with their positions mirrored on the starboard side by another trio. (Flickr.com)
While this was going on, members of the crew were permitted liberty in Sydney, a wonderful city and a welcome relief from several months of shipboard duty in the ANZAC Squadron, now designated Task Force 44. Sydney was no stranger to many Chicagomen, who brought the ship to the city in March, 1941, and to Brisbane as well, during the pre-war US Navy goodwill tour in the South Pacific.
But Captain Bode put strict limits on the crew, short reins, wanting them back aboard before midnight after only a few hours ashore. Perhaps he felt it appropriate in a time of war, but he had driven his men hard and some failed to abide in his restrictions. A few of the men returned late and were placed in the brig. But soon the numbers swelled and the additional detainees were placed in the empty flag officer spaces aboard. Such was life aboard Chicago with King Bode.
Japan’s Plans for Sydney Harbor
Danger indeed lurked in wartime Australia, though most people failed to recognize some of them. Warning signs of an impending attack by Imperial Japanese Navy midget submarines revealed themselves one by one, a ship attack, some signal intelligence, and reconnaissance aircraft overflights, but no one was the wiser and it was business as usual in Sydney Harbor, so far from the war.
These small submarines of the Type A Ko-hyoteki carried two 17.7-inch torpedoes and with a two-man crew, and were nearly 80 feet long and displaced about 465 tons. They were propelled by an electric motor which gave them a speed of up to 19 knots underwater. They were carried to a target area by a mother submarine and then launched to make their attack. These midget submarines were a weapon of asymmetric warfare which the IJN hoped would help deplete Allied naval strength. (Note: Although each submarine was given its own unique hull number, for the purpose of simplicity and clarity this post uses an M designation and the number of the mother submarine.)
The Japanese A type midget submarines carried two torpedo tubes and a crew of two. They displaced 46 tons submerged and were capable of attaining a submerged speed of 19 knots. (Royal Australian Navy)
First used to attack in December, 1941 in the Pearl Harbor attack, the midget submarines of the IJN submarine force planned simultaneous attacks on Allied ports at Sydney (by the Eastern Attack Group), as well as far-flung Diego Suarez harbor at Madagascar (Western Attack Group) off the east coast of Africa. These near-simultaneous attacks were intended to distract Allied forces from the upcoming Midway operation.
In May, 1942, the IJN deployed its submarines carrying the midgets, and those carrying reconnaissance aircraft, for these attacks. On May 23, the submarine I-29 launched its Yokosuka E14Y floatplane (later codenamed GLEN) on a daytime mission to scout for targets in Sydney Harbor whilst I-21 scouted the harbors at Noumea, New Caledonia, Suva, Fiji and Auckland, New Zealand. The plane was wrecked on its water landing back at the mother submarine, though the crew was rescued. This left I-21 as the only means to conduct a final reconnaissance before the attack.
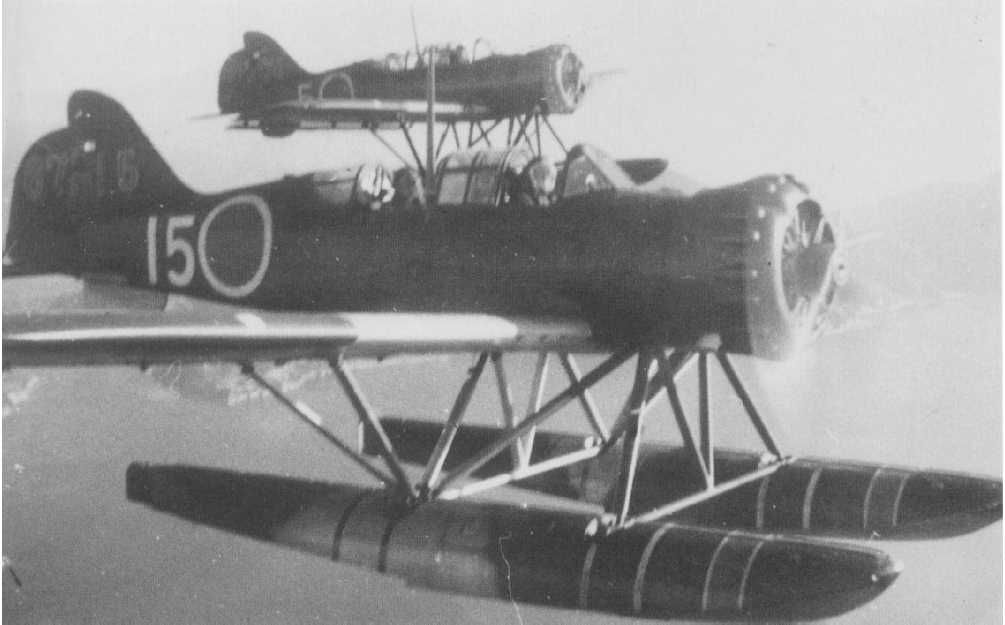
A pair of Yokosuka E14Y GLEN floatplanes of the type which conducted reconnaissance flights over Sydney in May, 1942 (Wikipedia)
Despite being detected by radar, the contact was dismissed as a glitch as there were no Allied aircraft operating over Sydney at the time and authorities did not consider the possibility of it being an enemy aircraft. The recon flight confirmed the presence of targets such as two battleships or large cruisers. With a possible British battleship Warspite spotted in the harbor, Sydney was selected as the target for the Eastern Attack Group. (Note: HMS Warspite had been in Sydney between March 20-26, 1942 enroute to the Indian Ocean from the United States after repairs at Puget Sound Navy Yard in Washington State.)
Shortly afterward, the five Japanese submarines of the Eastern Attack Group made a rendezvous some 35 nautical miles northeast of the Sydney Harbor entrance. Three I-boats, I 22, I-24 and I-27, carried a single midget submarine each, while the other two, I-21 and I-29, normally carried a single floatplane, though I-29’s had been wrecked on May 23.
Early on May 29, I-21’s aircraft was used to reconnoiter Sydney again in preparation for the attack two days later, on the night of May 31. The aircraft, with its Japanese hinomaru red rising sun circle markings painted out, flew at a relatively low altitude over the harbor area. Most personnel in the area were complacent. The war seemed so far away, and people who noticed it wishfully thought the aircraft must be an American floatplane from USS Chicago. This despite the fact that Chicago’s floatplanes were biplane Curtiss SOC Seagull types with a single large pontoon, as opposed to the single wing and twin pontoons of the Japanese E14Y floatplane. Only later did some people realize it wasn’t an Allied aircraft.
Despite flying at a low altitude within easy visual observation range, the aircraft was undisturbed on its early morning flight. The Japanese floatplane passed by Chicago, moored just off the east side of Garden Island, twice before returning to its mother submarine, having accomplished a thorough reconnaissance of the harbor.
Since arriving at Sydney in mid-May, Chicago’s gunnery officer had ordered two anti-aircraft guns, one anti-aircraft director and associated crews to keep watch. But two weeks in port must have dulled the sense of urgency, and none of Chicago’s anti-aircraft gun crews apparently noticed the aircraft flying scant hundreds of feet from their ship, though the officer of the deck, an aviator, recognized it as an enemy plane.
USS Chicago (CA-29) in Sydney Harbor, circa May 29, 1942 (AWM, via Wikipedia)
Chicago’s gunnery officer, William Floyd, was angry when he learned what happened. He ordered a high state of readiness for the gun and director crews – those on watch had to stand. Only crewmen with an actual sitting role, a gun pointer or trainer, or a director rangefinder, were allowed to sit. He wanted the men to be ready to respond to another Japanese plane, though as things turned out, they were ready for an enemy submarine.
This E14Y aircraft too, was wrecked in landing near its mother submarine, and the crew was rescued. They brought back confirmation that in addition to a cruiser (Chicago) by Garden Island there was another heavy cruiser in port (the Australian heavy cruiser HMAS Canberra). These in addition to other smaller warships and merchant ships and the usual harbor traffic with ferry boats. Sydney Harbor was a lucrative target.
Meanwhile, the Western Attack group struck first at Madagascar, on the night of May 30, and succeeded in putting a torpedo into Royal Navy battleship Ramillies and sinking a tanker. But the British didn’t pass any warning along to other Allies, perhaps unsure whether the attackers were Japanese or Vichy French.
The Battle of Sydney Begins
Came the night of May 31, and Chicago’s captain went ashore for a social engagement, a dinner with the Flag Officer-in Charge of Sydney Harbor, Rear Admiral G. C. Muirhead-Gould. One of Captain Bode’s good points is he apparently got along well with Allies, perhaps a reflection of his earlier diplomatic duty in Europe as a naval attaché. But on this night other events were to reveal his shortcomings.
Artist depiction of I-27 carrying a midget submarine (the-wanderling.com)
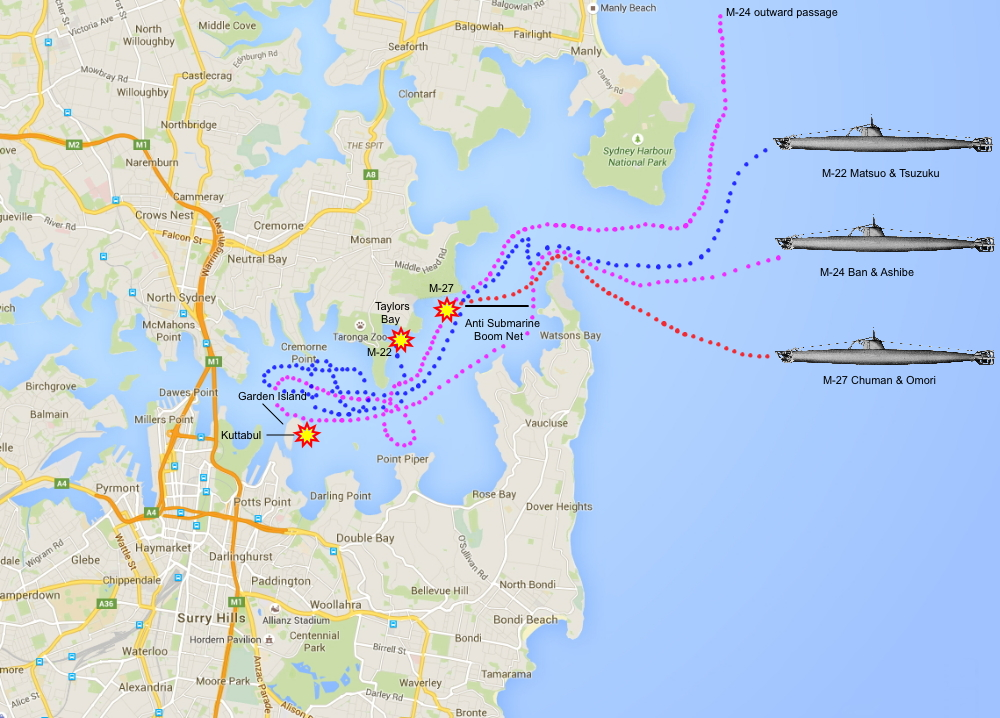
The three Japanese midget mother I-boats, I-27, I-24, and I-22, each launched one midget submarine in that order. The first submarine, M-27, entered Sydney Harbor at about 8pm, but hit an obstacle, backed off and became entangled in an anti-submarine net. As the crew tried in vain to extract themselves, they garnered attention from a couple of patrol boats. Trapped, the crew fired demolition charges at 10:37pm, which caused the harbor to go into an alarm condition.
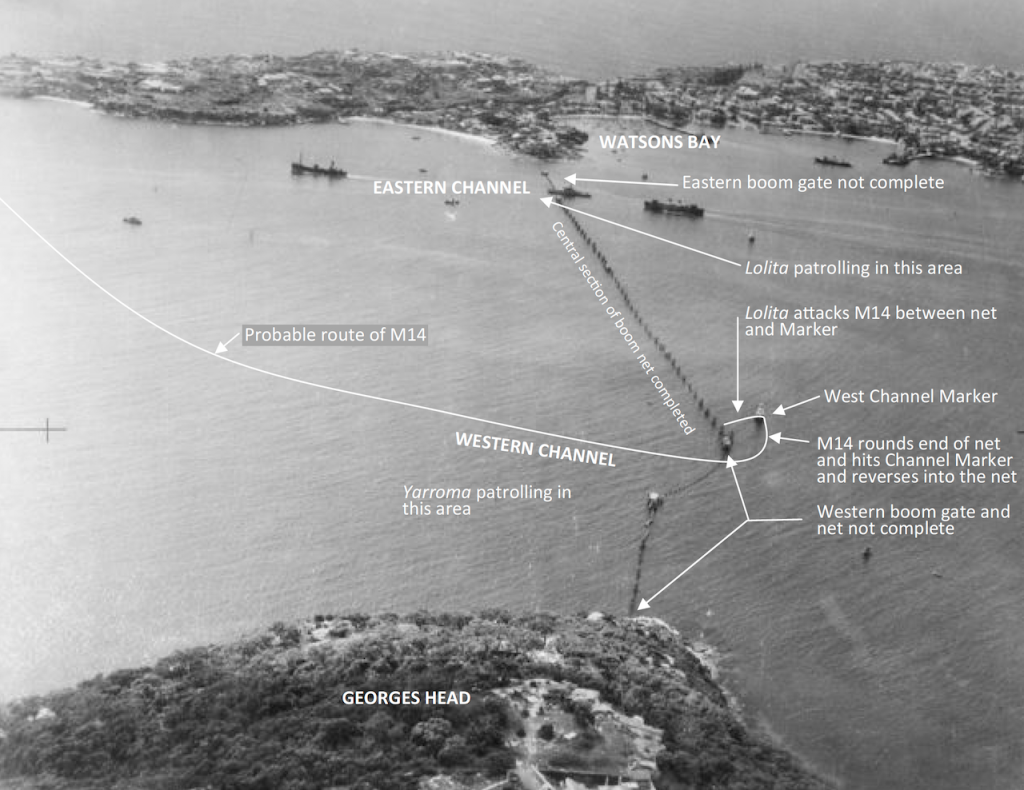
View of the Sydney Harbor Boom Net, where IJN midget sub M-27 (identified here by hull number M14) ran afoul the anti-sub net in the western channel. For orientation, north is to the left side of the picture. (Lolitaandthehollywoodfleet.com)
The second midget, M-24 entered the harbor successfully at 9:48pm and approached the Man-of-War anchorage near Garden Island. It was here that Chicago’s crew began its involvement in the battle.
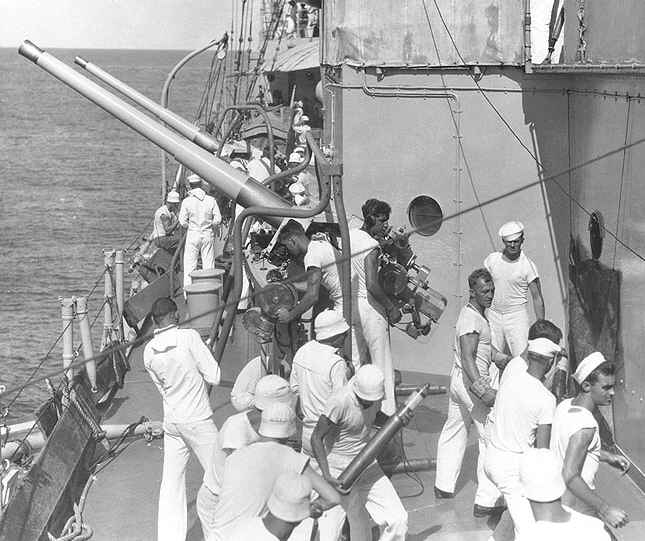
To sum up Chicago’s role in the battle, at 10:51pm alert lookouts noticed the conning tower of a submarine 300 yards off the starboard quarter. Chicago’s searchlight crews struck an arc, then opened the shutters and illuminated the interloper. The officer of the deck, Ensign Bruce Simons, saw it too and opened fire with his M1911 .45 caliber semi-automatic pistol. General quarters was sounded.
At 10:53pm, a 1.1-inch gun mount near the bridge of the ship opened fire and the gun crew quickly realized it could not depress the guns to bear effectively as the sub was too close. One or two (accounts vary) 5-inch gun crews tried. Depressing their guns as far as they could, they opened fire. But the range was too close again and the shells went above and beyond the sub.
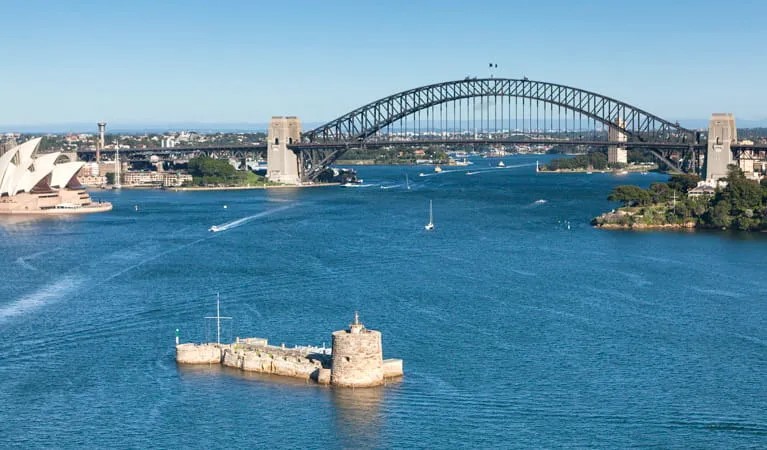
Some of the rounds hit the stone walls of Fort Denison, a small harbor fortification, and others caromed off into north Sydney and amidst shipping in the harbor.
Fort Denison in Sydney Harbor, viewed roughly from the same direction as seen from USS Chicago on the night of May 31, 1942 (nationalparks.nsw.go.au)
Fortunately there were no friendly casualties and not much damage. Although this did give rise to a radio commenter’s tongue-in-cheek story that one of Chicago’s shells had carried off into Taronga Zoo on the north shore and killed the lion there, and that the Australians hoped a replacement would be sent under the Lend-Lease program.
As the firing began, Chicago was on a four-hour standby for departure, with only one of eight boilers with steam up for supporting the ship’s non-moving needs. However, with pistol shots fired and general quarters sounding, the duty engineering officer, George Chipley, immediately took action to get the ship ready to move, and soon had both engine rooms and the four boiler rooms manned and ready. Lieutenant Commander Herman J. Mecklenburg was the senior officer aboard and took charge. He told the engineering officer to carry on with raising steam and getting the ship ready to go underway. He also signaled USS Perkins, moored nearby at Buoy number 4, to get underway and conduct patrols around Chicago and by 11:15pm, Perkins was underway.
USS Perkins (DD-377) refueling from HMAS Hobart (D 63) while underway in the Coral Sea/Solomon Island area in May, 1942. Museums Victoria Collections, Photo No. MM 12320 (NavSource)
Between the firing and the searchlights the commander of the sub, Sub-lieutenant Katsuhisa Ban, may have realized something was amiss, or he was blinded in the periscope, and/or perhaps he realized he wasn’t at optimum range himself, and the sub submerged. It appeared again about three minutes later, some 300 yards off Chicago’s starboard bow, and the cruiser opened fire again. The Australian corvette HMAS Geelong berthed on the western side of Garden Island also saw the sub and opened fire.
The racket in the harbor drew puzzled responses from military and civilians alike, not yet on to the fact that the harbor had been penetrated by enemy craft. The sound of depth charges exploding at 11:07 pm added to the chaos, as an Australian patrol craft conducted an attack on the third midget sub to enter the harbor, M-22. The sub survived this attack, and waited patiently before moving again after the patrol boat lost contact.
The tracks of the three midget submarines through Sydney Harbor. (Royal Australian Navy)
His dinner event ruined by the battle, Chicago’s guns firing and the thumping of depth charges in the distance, Captain Bode returned to Chicago at about 11:30pm in a rage. Commander Mecklenburg tried to tell him what had happened, but Bode was instantly dismissive, accusing his officers of being drunk, insubordinate, jittery fools – there weren’t any periscopes, there weren’t any submarines. He ordered the ship to stand down from General Quarters and to stop all preparations to go to sea. He also ordered destroyer Perkins to cease patrol and return to her mooring.
M-24 attacks Chicago
Bode was still dressing down his officers up on the bridge when M-24 attacked at half past midnight. The midget M-24 fired its two torpedoes at Chicago from aft of the ship; both missed the cruiser, one to port and the second to starboard. Perhaps the steam emanating from Chicago’s smokestacks made the ship appear to be underway and the aim was adjusted incorrectly as Chicago stayed moored at Buoy number 2.
As the torpedoes sped past Chicago, Captain Bode was laying into his officers, telling them how they were to blame for the chaos, fools that got excited over nothing. Bridge personnel saw a torpedo track and warned the captain, but he dismissed it, saying “Hmp! It’s just a motor launch going by.” As he turned to berate his officers again – BOOM! The first torpedo detonated, with an orange flash lighting up the surface accompanied by a huge water geyser.
But Bode’s initial reaction was dismissive yet again,. “There you go, you must have gotten the shore batteries opening up.” Still, a bit of doubt had crept in, and he ordered Commander Mecklenburg to take his gig to Garden Island to make a report and an inquiry as to the cause of the explosion.
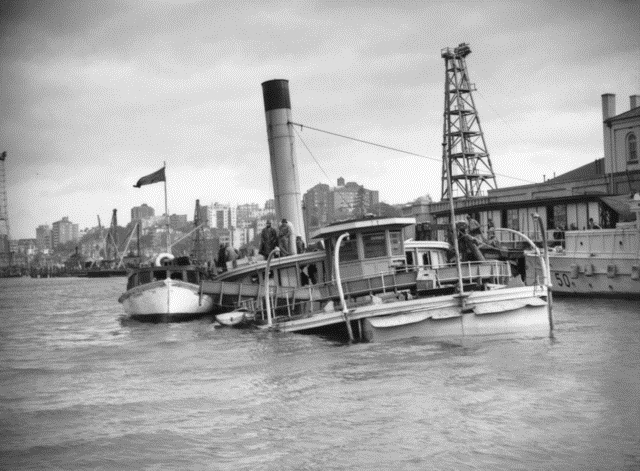
The first torpedo that missed Chicago on the port side continued on for 1500 yards and passed beneath the Dutch submarine K9 and the HMAS Kuttabul before striking the Garden Island sea wall and detonating. HMAS Kuttabul, a ferry boat requisitioned as a RAN barracks ship, sank swiftly and 21 Allied sailors were killed, 19 Australian and two British. The other torpedo that missed Chicago ran ashore on Garden Island. M-24 eventually escaped the scene, exited Sydney Harbor and disappeared, at least until it was discovered in 2006 on the bottom of the sea off the coast northeast of Sydney.
The accommodations ship HMAS Kuttabul rests on the bottom of Sydney Harbor at Garden Island after the battle; 21 sailors died aboard her. (Australian War Memorial, via Wikipedia)
By this time with the general alarm in the harbor and an actual attack it was time for ships to evacuate the harbor. Captain Bode reversed his order to cancel preparations to go to sea and by 2:14 am, Chicago advised Garden Island she was ready to depart. Perkins preceded Chicago on the way out of Sydney Harbor, a prudent measure given the presence of the Japanese I-boats in the area. In the hectic departure, a crewman was left on the mooring buoy. And Lt. Cmdr. Mecklenburg chased after the ship in the captain’s gig; the ship slowed and Mecklenburg scrambled aboard.
One wonders if he should have waited, though his return did result in an ironic exchange with Captain Bode, who continued to hector his officers. Chicago was leaving Sydney Harbor as the third midget sub, M-22 re-entered the harbor. Needling Mecklenburg as the ship exited the harbor at 2:56 am, Bode said “You wouldn’t know what a submarine looks like.” To which Mecklenburg responded as he pointed to a midget submarine passing along Chicago’s starboard side “They looked like that, Captain.” Captain Bode finally became a believer, and ordered a message sent to Garden Island “Submarine entering harbor.”
M-22 was later detected in Taylors Bay and subjected to attacks by three Australian patrol boats which damaged the sub, after which the crew killed themselves.
Aftermath
Fortune smiled on Chicago in this battle against the midget subs and Captain Bode. After the excitement of the attack, Chicago briefly returned to Sydney Harbor in the afternoon of June 1 and by evening was out to join the other ships of Task Force 44 and then on her way up Brisbane way. She managed to dodge the five I-boats, which may have been laying low in hopes of a return of the midget subs from Sydney Harbor, but none of the boats returned
No battle star was awarded to Chicago for the Sydney Harbor battle. This writer isn’t clear about what level of fighting is deemed qualified for the recognition with a battle star, but Chicago fought there and the center of attention at the Battle of Sydney, May 31 – June 1, 1942.
Of note, after the battle, the parts of midgets M-27 and M-22 were used to construct a composite vessel, now on display at the Australian War Memorial in Canberra. The conning tower of the M-22 is also on display, at the Naval Heritage Centre on Garden Island, in Sydney Harbor. Sunken M-24 is protected as a war grave.
The composite midget submarine now on display at the Australian War memorial, Canberra (Royal Australian Navy)
When Chicago returned to Sydney some three months later for battle damage repairs after the ignominious Battle of Savo Island, Captain Bode was presented with the net cutter from one of the midget submarines. One wonders how the crew felt about this memento. But there would be no trophy for his performance at Savo Island.
References
A Very Rude Awakening, Peter Grose, Allen & Unwin, Sydney, 2007
May 7 was thought to be the day of battle between the opposing American and Japanese fleet carrier task forces. It would have been had it not been for significant errors on both sides which caused the fleet carrier task forces to miss each other.
US Army in World War II, Victory in Papua, page 35 (Ibiblio.org)
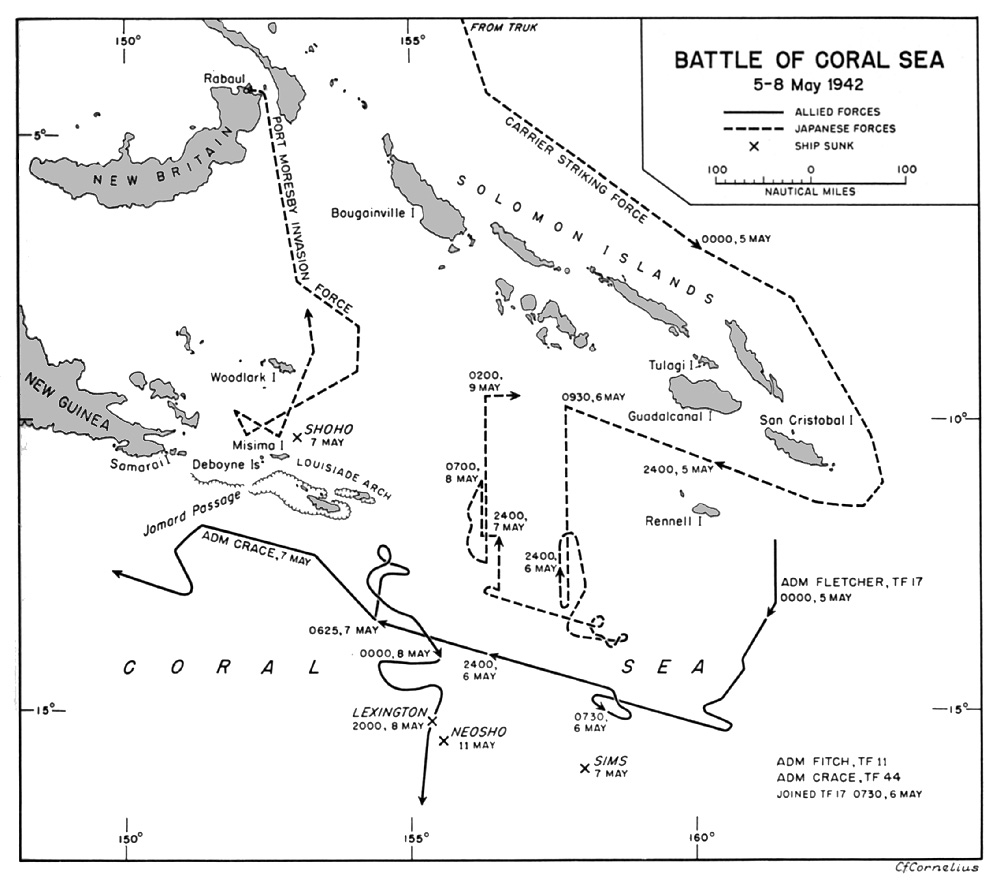
Instead, American carrier-based aircraft from USS Lexington (CV-2) and USS Yorktown (CV-5) sank the Imperial Japanese Navy (IJN) light carrier Shoho, which was providing air cover for the Port Moresby Invasion Force. This was the first Japanese aircraft carrier lost in the Pacific War.
Japanese aircraft carrier Shoho is hit, during attacks by U.S. Navy carrier aircraft in the late morning of 7 May 1942. Photographed from a USS Lexington (CV-2) plane. (Naval History and Heritage Command)
Meanwhile, Japanese carrier aircraft from IJN fleet carriers Shokaku and Zuikaku sank destroyer USS Sims (DD-409) and heavily damaged and disabled oiler Neosho (AO-23), which were waiting in a position thought to be out of the battle area.
US Navy fleet oiler USS Neosho (AO-23) under attack by Japanese carrier aircraft, May 7, 1942 (Japanese-aviation.forumotion.com)
But before these attack efforts, TG 17.3 the Support Group, received a mission. Commanding Officer, Australian-born Rear Admiral John G. Crace, Royal Navy, had been chomping at the bit for months for combat action for the ANZAC Squadron. He chafed at previous operations in which the squadron was defensively positioned and saw no action against the enemy, such as during the Lae-Salamaua Raid of March 10, 1942. Now, with the enemy closing ever nearer to Australia, he would finally be given that opportunity on this May 7, 1942.
Admiral John G. Crace, RN, Commander of the ANZAC Squadron/TF 44, and during the Cattle of the Coral Sea Commander of Task Group 17.3, the Support Group. (Wikipedia)
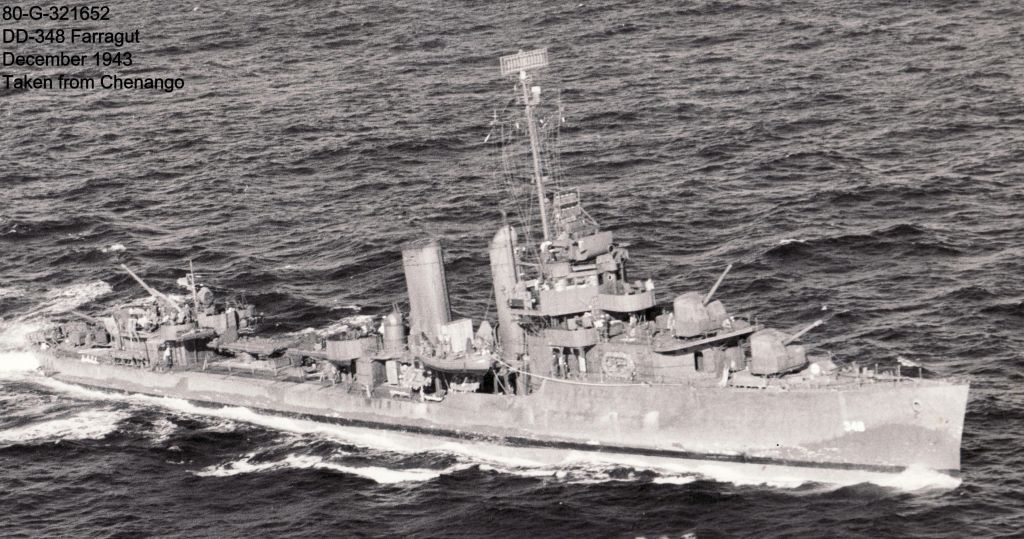
Augmented by destroyer USS Farragut (DD-348), the three cruisers and now three destroyers of TG 17.3 were ordered to detach from TF 17 and interpose themselves between Port Moresby and the Japanese invasion convoy heading for it, to accomplish an intercept and “…destroy enemy units proceeding through Jomard Passage.”
Destroyer USS Farragut (DD-348) was a late addition to the Support Group but participated in the action of May 7, 1942 (NavSource)
At 0655, the Support Group detached and assumed a course of 315 degrees True. At 1002, the formation shifted into an anti-aircraft disposition, described as a loose diamond formation with the flagship heavy cruiser HMAS Australia in the center, Chicago on her starboard quarter and light cruiser HMAS Hobart off her port quarter. The three destroyers were positioned with one 1,200 yards ahead of each cruiser; USS Perkins (DD-377) ahead of Australia, USS Walke (DD-416) ahead of Chicago and Farragut ahead of Hobart. Course was adjusted to a more westerly heading as the ships zig-zagged at a brisk 25 knots on a smooth sea with scattered nimbus clouds at 10,000 feet.
Admiral Fletcher was hedging his bets, fielding his forces in such a manner as to ensure accomplishment of primary mission to prevent the enemy from invading Port Moresby on the southeast coast of New Guinea. This was somewhat of a controversial move, in that the Support Group had no air cover from friendly fighters from either the TF 17 carriers or land-based aircraft. In addition, had enemy carrier forces been successful in defeating TF 17, little TG 17.3 would be easily handled. Still, Fletcher decided to divide his forces, which also weakened the screen of vessels defending his carriers. Whether the risk was greater than the benefit or not, Fletcher took it to prevent the enemy from accomplishing his objective.
Meanwhile, the lack of air cover would be a nagging issue for the Support Group on this day. Scant minutes after adopting an anti-aircraft formation, with the three destroyers leading the three cruisers, at 1010, an air contact was sighted. It would be the first of many in the next couple of days
By noon the Support Group had managed to make its way about 200 miles west of TF 17. Radar operators and lookouts scanned the skies for any potential threats. Three enemy twin engine bombers were sighted trailing the formation, one to each side of the formation and another astern, at low altitude and outside gun range, taking advantage of cloud cover to hide and then appearing again. Unfortunately for Crace and his group, it seems his ships were misidentified as including two aircraft carriers, and two groups of Japanese land attack bombers already airborne searching for TF 17’s carriers were given orders to attack.
Phase One
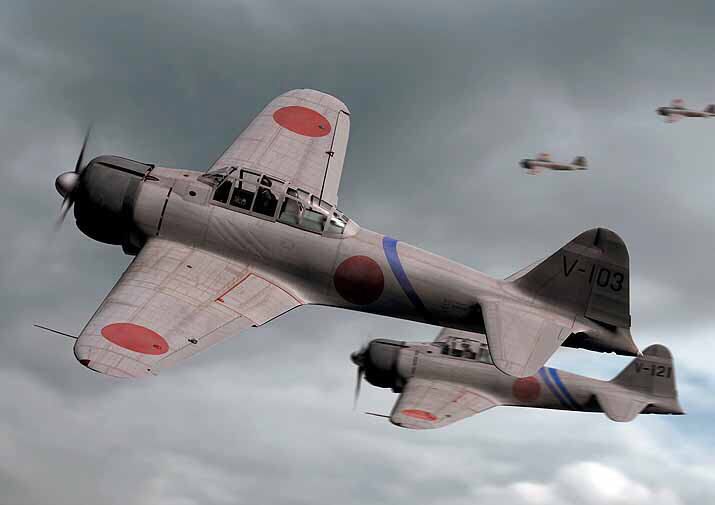
Radar contact was made at 1427 on a small group of aircraft bearing 135 degrees True at 25 miles (the ship’s anti-aircraft action report says 30 miles) and the ships once again assumed a higher level of readiness, appropriate for what was about to transpire. Soon, a dozen single engine aircraft hove into view to initiate Phase One of the battle that day. Chicago was unable to determine the type but they were Mitsubishi A6M2 Type 0 (Zero) fighters belonging to the Tainan Air Group, sent out as escorts for land attack aircraft (Rikujo kogeki-ki, abbreviated as Rikko) sent out to attack the American carriers in the Coral Sea. Having reached the limit of their endurance in an unsuccessful search for the carriers, the fighters were on the way back when they passed along the port side of the Support Group.
Tainan Kokutai (Air Group) Mitsubishi A6M2 Type 0 (Zero) fighters
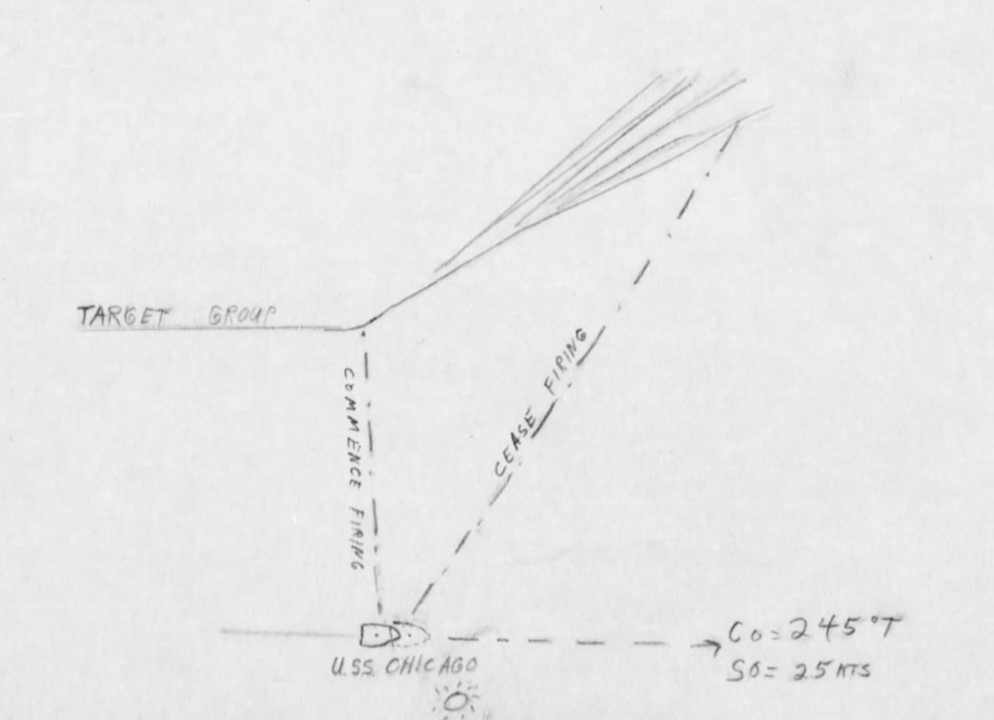
The aircraft passed close enough to draw fire, about 6,000 yards away off the port beam. After a minute of 5”/25 anti-aircraft fire, 39 rounds expended, the aircraft were seen to loosen their formation and head away from the ships with no aircraft shot down nor any indication of damage. Of note, the action was fought by the personnel at readiness Condition II stations.
Depiction of engagement of Japanese Zero fights passing by the Support Group on the afternoon of May 7, 1942, from USS Chicago’s action report.
At about 1445, a single engine aircraft approached, and the ships set Condition of Readiness 1. The aircraft was challenged and responded by dipping a wing, circling and lowering its landing gear. Identified as a friendly SBD Dauntless lost on its morning mission, it dropped messages on the decks of Chicago and HMAS Australia as the pilot inquired about the location of the nearest friendly airfield. By 1450 the aircraft flew on and the ships lowered their readiness condition. (Note: This was a Yorktown VB-5 SBD Dauntless dive bomber flown by Ensign J. W. Rowley which had chased after enemy aircraft in the attack against Shoho and became separated from his formation. Due to Admiral Fletcher’s radio silence, the Support Group could not give him a vector to TF 17. Ens. Rowley was able to successfully force-land on the Papua New Guinea coast and he and his radioman/gunner eventually returned to friendly control.)
Phase Two
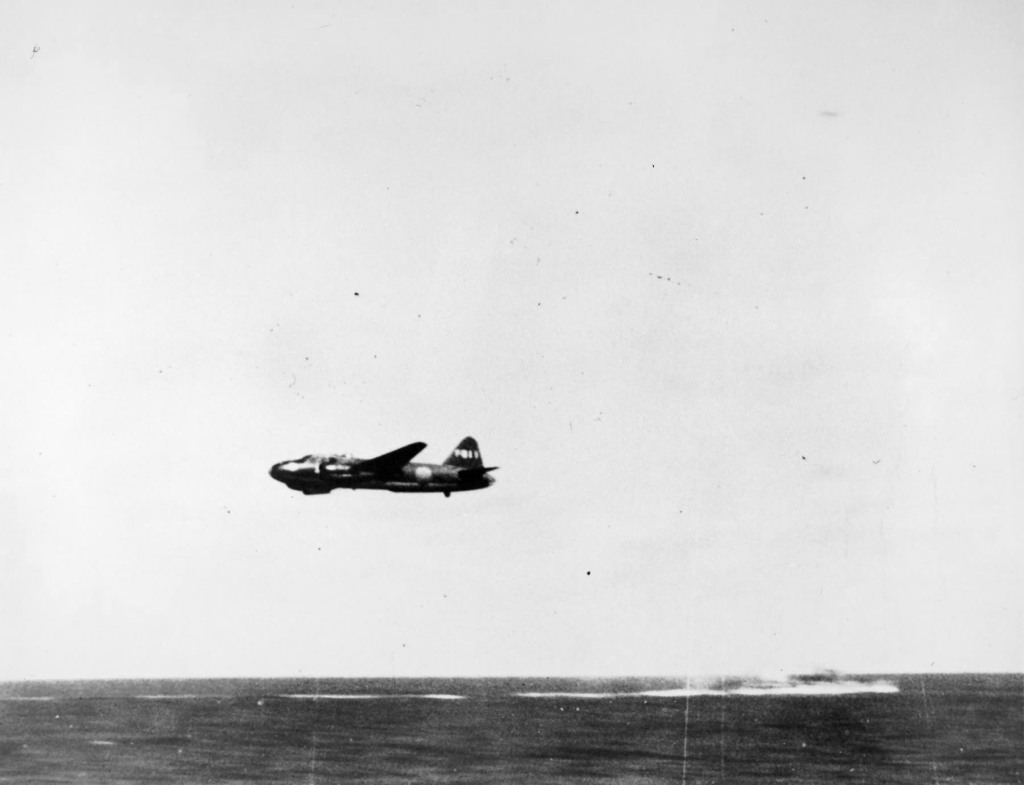
This was soon followed at 1500 by a bona fide attack on the Support Group by a force of 12 torpedo-armed Mitsubishi G4M Type 1 land attack planes (Rikko) of the 4th Air Group, the “BETTY” as the type was later code-named. This was the first of three wartime encounters with the Type 1 which Chicago experienced, and Phase Two of the battle.
Mitsubishi G4M (BETTY) Type 1 Land attack planes (RIKKO) in formation over Pacific waters. (Worldwarphotos.info)
Initially detected by Chicago’s CXAM radar 75 miles away, the aircraft were acquired visually with binoculars 15 miles away as they approached from the front of the ships at about 5,000 feet altitude and tracked for three minutes before opening fire against them. Unfamiliar with the Type 1 Rikko, the aircraft were identified as Mitsubishi Type 97 heavy bombers, “apparently modified with machine gun blisters on side of fuselage and no tail wheel visible.” In the heat of battle, Chicago’s crew also noted 14 enemy planes in the attacking formation, when in fact 12 attacked.
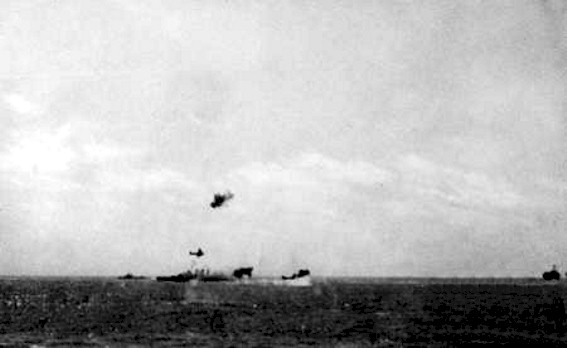
When they reached a point about 12 miles away they began a shallow, downward power glide. They reached an attack altitude of about 100 feet by the time they reached eight miles range and came at the ships centered on HMAS Australia in the center of the formation.
The enemy approaches! Ships of the Support Group engage enemy torpedo planes in the afternoon of May 7, 1942. Pictured here is possibly USS Farragut (DD-348) or USS Perkins (DD-377) (source indicated it was USS Walke (DD-416) ahead of HMAS Hobart as a barrage of AA gun shells detonate in front of the attackers. The smoke is like from one or two of the first aircraft shot down during the attack, before they reached the Support Group. (Wikipedia)
As they neared, Chicago observed eight planes approaching from 350 degrees relative bearing, toward the center of the formation – four more swung to the right to approach from 240 degrees relative, with two more reported that swung to the left aiming at the starboard bow. The time between the first tracking of the inbound aircraft and opening fire on them was three minutes, and firing began at a range of some 6,500 yards fine on the bow at 355 degrees relative.
Mitsubishi G4M (BETTY) Type 1 Land attack plane during a torpedo attack against Allied ships, in this case three months after Coral Sea, off Guadalcanal, August 8, 1942 (Worldwarphotos.info)
Devoid of friendly air cover, the ships were on their own and made maximum use of available firepower against this low-level torpedo attack. The Gun Moll readied a hot reception for the Rikko. As the enemy attacked and passed through and abeam of the formation, all eight 5”/25-caliber anti-aircraft (AA) guns fired, as did the forward six 8”/55-caliber main battery guns, which laid fire in into the water short of the enemy planes to create waterspouts and affect their attack, an early war doctrine of US Navy heavy cruisers against torpedo plane attack.
In addition, the four quadruple 1.1”/75-caliber caliber automatic guns opened up as did the ships’ eight .50-caliber machine guns mounted atop the foremast and aft. Not to be left out of the fray, six .30-caliber Browning Automatic Rifles (BAR) fired on the enemy, likely by Marines of the Marine Detachment, as well as seven jury-rigged .30-caliber Browning machine guns from the aviation division aboard, weapons from the SOC Seagull floatplane unit embarked.
Drawing of the torpedo plane attack on the Support Group, May 7, 1942, from USS Chicago’s action report.
Two planes were felled by the AA fire of the formation during their initial approach, likely shot down by the screening destroyers ahead of HMAS Australia. The enemy aircraft lowered themselves a bit more to drop their torpedoes into the water, noted as low as 40 feet except for one plane that stayed between 100 and 150 feet.
Two Rikko pass along the port side of HMAS Australia as major caliber AA shells explode amongst them. USS Walke (DD-416) is in the background at left just in front of Australia (Source indicates USS Perkins, but higher resolution pictures show the destroyer has one smoke stack, like the Sims-class (USS Walke was of this class). At right edge is what may be another air burst and/or USS Chicago maneuvering/behind an airburst. (Wikipedia)
They dropped their fish at 1,000 to 1,200 yards from the various ships they aimed for, and hitting none of them amidst the ferocious defending fire as more of them fell. One Rikko, perhaps the leader, was set afire and exploded in mid-air. Another’s port engine and wing flamed up and it crashed.
HMAS Hobart maneuvers and fires against the Japanese torpedo attack of May 7, 1942. USS Chicago (CA-29), with her prominent tall foremast, is depicted in the background at left, also maneuvering and firing during this sharp air-sea action. (Artist Phillip Belbin, via Horatio J. Kookaburra in Flickr.com)
Another was set afire in the port engine before its tail was shot off and it crashed. Two more were hit in their starboard engines and crashed. Another Rikko was hit in the starboard engine and limped away smoking heavily, and at least two other planes were riddled by the automatic weapons fire. Altogether Chicago’s crew assessed five enemy aircraft shot down with another possible and two-to-three more damaged. Japanese losses were actually four Rikko shot down in vicinity of the Support Group and another lost after it ditched from battle damage at Deboyne Island. Six others were damaged leaving only one of the 12 unscathed.
The May 7 torpedo attack against the Support Group, as depicted in the action report of USS Walke (DD-416)
Chicago managed to dodge two or three torpedoes aimed at her. Up to six enemy aircraft, approaching as close as 70 to 100 yards away, strafed her with 7.7 mm machine gun fire which killed two Chicagomen. Seaman First Class (S1c) Anthony B. Shirley Jr., was killed when hit in the head by shrapnel from gunfire and died while at his battle station as a gun pointer on anti-aircraft gun No. 5 during the enemy torpedo-bomber attack. Baker Third Class (Bkr3c) Robert E. Reilly, was mortally wounded by gunfire to the head during an enemy torpedo-bomber attack on his ship while at his battle station (probably as a lookout) up on the searchlight platform on the mainmast. Bkr3c Reilly died from his wounds the next day and was buried at sea the same day, May 8, along with S1c Shirley.
All weapons functioned well in the attack, except for two 5” shell cases with oversize mouths which jammed two guns. Crews made efforts to clear the weapons and did so, but not before another high-level bombing attack against the formation developed, right after the torpedo plane attack.
In defense, in three minutes of firing Chicago expended some 127 rounds of AA Common ammunition, 12 rounds of 8-inch, 720 rounds of 1.1”, 1,800 rounds of .50-caliber, 120 rounds of .30-cal BAR and 1,500 rounds of .30 caliber, a veritable porcupine of AA fire aimed at the low-flying Rikko.
Phase Three
In Phase Three of this air action, enemy aircraft were detected 45 miles away. As they closed from the rear of the formation at about 14,000 feet altitude (other ship’s reports indicated 20,000 feet), the number estimated was up to 26 (other ship’s reports counted 19), identified as Mitsubishi G3M Type 96 heavy bombers from the Genzan Air Group, the Type 96 land attack plane later code-named NELL. This would be the first of two occasions in which Chicago battled against the G3M Rikko.
Mitsubishi G3M (NELL) Type 96 Land attack planes carried their weapons externally, in this case bombs. (Wikipedia)
At 1526 the aircraft passed along the starboard beam of the group in a massed “V” formation (also reported as two “V’s”) before making a turn to the left to cross over the Support Group on their bomb run.
The high altitude, level bombing attack against the Support Group, as depicted in USS Chicago’s action report.
Both starboard and port 5”/25 batteries aboard Chicago took them under fire at about 5,500 yards, six guns in all with two still jammed; first the starboard battery fired on them for five minutes, then the port battery for four minutes as they crossed over the formation, ceasing fire as the aircraft were at 9,000 yards, expending some 184 rounds. Although no aircraft were shot down, four were reportedly damaged by the Support Group’s AA fire.
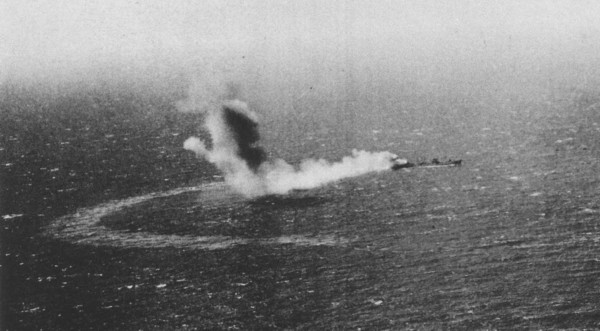
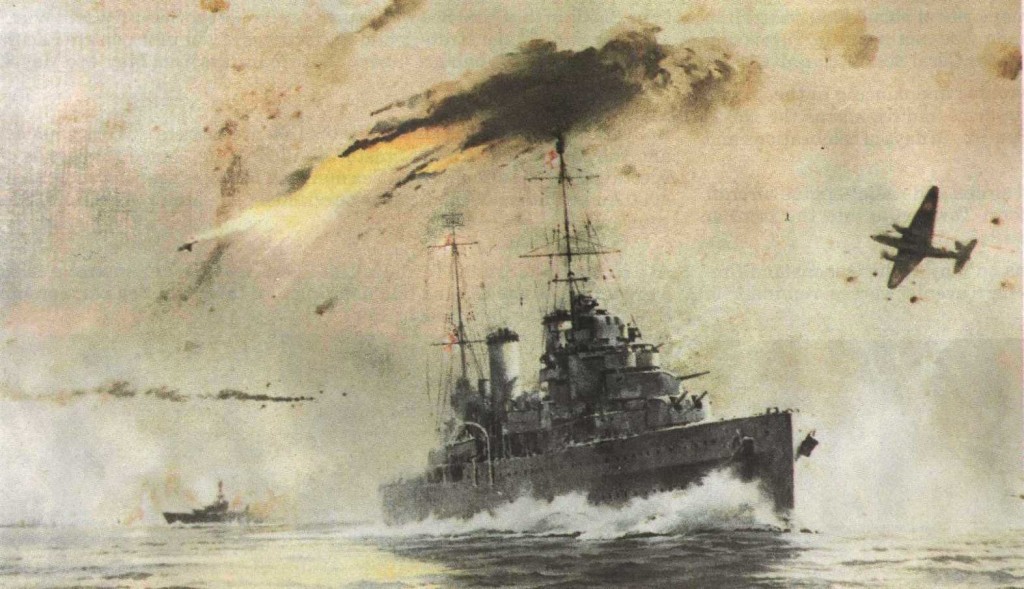
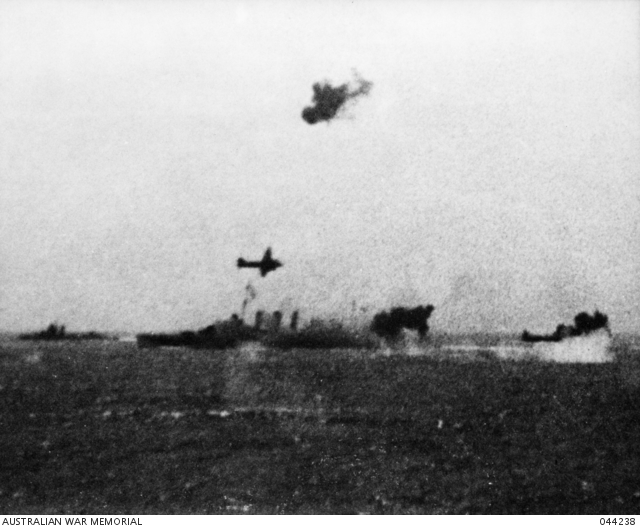
The attacking aircraft aimed at HMAS Australia in the center of the formation. A curtain of water erupted around the heavy cruiser and as she maneuvered smartly the bombs hit, completely obscuring her from view – many thought she was done for with such a concentration of weapons so close, Captain Bode aboard Chicago was reported as exclaiming “Goodbye Australia!”
HMAS Australia obscured as bombs fall all around her during the high and level-bombing attack on the Support Group on the afternoon of May 7, 1942. A USN destroyer, USS Walke (DD-416) is in the distance at left. Photo likely taken from HMAS Hobart (Australian War Memorial)
But HMAS Australia proudly emerged from the foaming waters with only some splinter damage from several near misses; destroyer Perkins was hit by bomb splinters as well; the ships having dodged 33 250-kg bombs dropped by the level bombers.
Phase Four
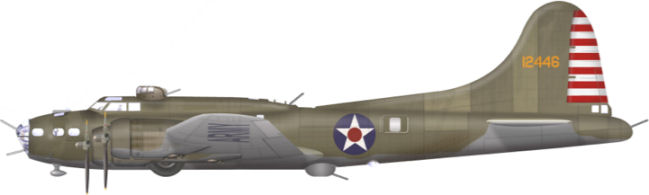
As intense as this independent mission had been so far, yet another air attack developed shortly after the Type 96 Rikko level bombing – at 1527 another high-level bombing attack took place, this time from friendly air forces! A formation of three US Army B-17E Flying Fortress heavy bombers had been sent out against enemy ships, and apparently had not received word of the Support Group being where it was in the Coral Sea.
Artistic depiction of USAAF B-17 Flying Fortress attacking Japanese shipping during the Battle of the Coral Sea (Alchetron.com)
After an unsuccessful search for Japanese ships, the heavy bombers approached the Allied ships as they were under torpedo plane attack by the twin-engine Type 1 Rikko, which were mistaken at altitude by the B-17 crews as twin-engine US Army B-26 Marauder medium bombers attacking enemy ships. The pilot of one of the B-17s decided to attack and dropped his bombs, with five hitting near USS Farragut but missing about 200-300 yards off the starboard quarter where Farragut would have been had she not quickly changed her speed and course.
An angered Admiral Crace radioed TF 17 at 1526 that he could not complete his mission without air support. The admiral was vexed by TF 17’s radio silence (a prudent protective measure to prevent revealing his location to the Japanese) and was unaware of Admiral Fletcher’s current location or intentions as the battle unfolded. He also sent a nastygram to ComSoWesPacFor about the need for naval vessel recognition training by Allied aircrews.
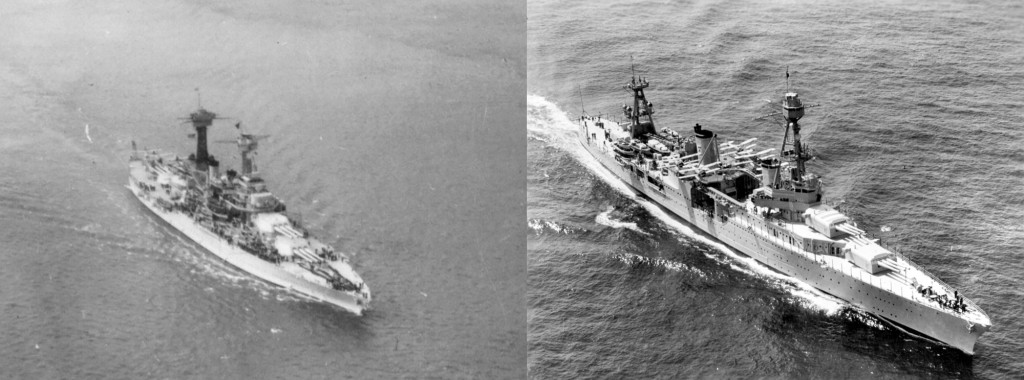
The Japanese aircrews that attacked the Support Group reported they had sunk a California-type battleship, damaged another battleship and also hit a cruiser. Chicago with her tall foremast and mainmast was likely the vessel misidentified as a California-type battleship, an identification error that would happen more than once.
Comparison between USS California (BB-44) at left and USS Chicago (CA-29) at right. Common features included triple gun main battery turrets, tall foremasts and mainmasts, and two smokestacks. (Pictures via Navsource pages for BB-44 and CA-29, respectively)
Meanwhile, the task group changed course to the south until after dark, in order to distance the ships from Japanese land and carrier-based aircraft, turning northward after dark to be in an intercept position. But the situation which the Support Group was deployed for, to repel enemy invasion forces encountered in the Jomard Passage, more or less took care of itself.
With the loss of light carrier Shoho and dedicated air cover, the Port Moresby Invasion Force withdrew from the area pending the outcome of the expected battle between the fleet carrier task forces on May 8. Orders were issued to posture two of the Japanese forces, the remains of Rear Admiral Goto’s Covering Group (minus carrier Shoho, four heavy cruisers and a destroyer), and Rear Admiral Kajioka’s Port Moresby Invasion Group (a light cruiser and six destroyers guarding the transports and other auxiliaries), to hold a position south of Rossel Island to fight a night surface action if Allied forces came in range.
By 1900 hours, it seemed the days troubles were past and at 1920, the Gun Moll went to Readiness Condition II. The ship’s war diary notes receipt of a ComSoWesPacFor estimate of enemy ships in the area north of the Louisiade Archipelago which indicated the Support Group could face one carrier, eight cruisers, 18 destroyers, two or more subs, a sub tender and 18 cargo transports or cargo vessels, formidable odds, though the carrier, likely a reference to Shoho, was already sunk.
May 8 off the Jomard Passage
The day the American and Japanese carrier task forces dueled, May 8, was relatively quiet for TG 17.3 as it lingered in an interposing position in case the Japanese changed their mind. Rain squalls were intermittent in the area, with low visibility through the morning hours, which likely helped screen them from the enemy. But still, enemy aircraft searched the Coral Sea and the ships had to keep their guard up and maintain situation awareness, especially without any friendly air cover.
At 1055 an aircraft was signed at seven miles distance. Challenged, it did not respond and withdrew. Radar detected an aircraft at 20 miles at 1250. It was sighted and HMAS Australia challenged it. The flagship failed to receive a response and opened fire on the aircraft, which withdrew.
In the mid-afternoon came a report from TF 17, that the first enemy air attack that day was repelled with what at the time seemed “negligible damage.” Indeed it was, before the sudden eruption of fires which ultimately doomed the damaged carrier USS Lexington (CV-2), with which Chicago had steamed many miles earlier in the war.
“Lady Lex” in distress! USS Lexington is pictured her in her last hours as she succumbed to fires caused by battle damage inflicted by Japanese carrier aircraft in the morning attack of May 8, 1942 (NavSource)
A late-afternoon report indicated an enemy carrier heavily damaged with two others in the area some 300 miles to the east of the Support Group. This was followed by a message that Task Force 16, centered on carriers USS Enterprise (CV-6) and USS Hornet (CV-8), would take command of forces in the Coral Sea upon arrival in the area. TF 16 had launched the famous Doolittle Raid on Tokyo on April 18, then headed back to Hawaii for a quick turn before being sent down to the Coral Sea, though too late to join in the battle.
Epilogue
But the action died down in Coral Sea by evening on May 8, as TF 17, including damaged carrier USS Yorktown disengaged. The Japanese invasion effort was postponed. Indeed, it was never attempted again as the tide of the war began to turn. This epic Battle of the Coral Sea was over, the first naval battle even in which the opposing ships did not sight each other, which was fought solely by aircraft against ships. Many lessons were learned by both sides, with little time to comprehend and apply before the next big battle at Midway a month later.
For Chicago and the others in TG 17.3, they would soon leave the Jomard Passage area. On the evening of May 10 the ships were detached from TF 17 and as TF 44 under ComSoWesPacFor control again, headed for a tanker off the Australian Coast to refuel and then remain near Australia.
On May 11, Chicago anchored at the refueling rendezvous along the Australian coast and took oil from a tanker in the afternoon. While this was underway, she received orders to proceed with Perkins to Sydney for “repairs and upkeep.” Among other things, she would be fitted with 20mm Oerlikon anti-aircraft cannons to replace her .50-cal machine guns. And, as things turned out, she would see battle again sooner than the distant Midway fight, in a fracas right in Sydney Harbor, another story to be told of the Gun Moll of the Pacific.
This year marks the 80th anniversary of the Battle of the Coral Sea, the first sea battle in which opposing ships never sighted each other, with the fighting principally by carrier-based aircraft. USS Chicago (CA-29) participated in this battle and fired in anger at enemy aircraft.
In response to fleet orders as the battle approached, on the last day of April, 1942, USS Chicago and USS Perkins (DD-377) got underway from Noumea, New Caledonia and headed northwest to join up with Task Force 17. These two American ships of Task Force 44 (formerly the ANZAC Squadron prior to April 22, 1942), Chicago with Perkins joined USS Lexington (CV-2) and the rest of Task Force 11 on May 1, 1942. On May 2, TF 11 then accomplished rendezvous at 0655 with carrier USS Yorktown (CV-5) and TF 17 under the command of Rear Admiral Frank Jack Fletcher, USN.
It was a day of logistics. Each task force had an oiler and in the mid-afternoon Chicago took her turn and completed her refueling from the plodding (11 knots speed max) USS Tippecanoe (AO-21) in less than an hour.
USS Tippecanoe (AO-21) circa July, 1942 (NavSource)
In the late afternoon, after a submarine scare with a report of a contact 13 miles away, Chicago and Perkins were detached from TF 11 and joined TF 17, designated as TF 17.2 under command of Rear Admiral W. W. “Poco” Smith aboard USS Astoria (CA-34).
In the morning of May 3, TF 17 conducted 40-minute long a simulated torpedo plane attack, a useful exercise for what was soon to come. That afternoon, another exercise, a Fox type, which involved range finder calibration and lasted some 90 minutes. TF 17 meandered in the Coral Sea, on course 290-degrees True, then to 310, then 030, to 330, 295 and 010.
USS Yorktown (CV-5) circa April, 1942 (NavSource)
On this day, Chicago received her tasking for the upcoming battle in ComTaskFor 17’s Operation Order No. 2-42 (1 May 1942) to be implemented on order for the anticipated battle. Under this order the ANZAC Squadron/TF 44 would become Task Group 17.3, the Support Group, charged with defending the carriers, supporting the Attack Group and also furnishing air patrols as required. It was to be commanded by Rear Admiral John G. Crace, R.N. and composed of HMAS Australia (Flagship), USS Chicago, HMAS Hobart and two destroyers, USS Perkins and USS Walke (DD-416).
But then something new. Reports of enemy landings in the Solomon Islands at Tulagi reached the task force, and the Commander, Admiral Fletcher, acted on the reports with an intent to strike back at the enemy. Leaving TF 11 and Lexington behind to complete refueling, TF 17 with Chicago changed course to 000 at 2030 hours, about 40 minutes later TF 17 picked up the pace, making 24 knots and over an hour later boosted that to 27 knots. Action was imminent!
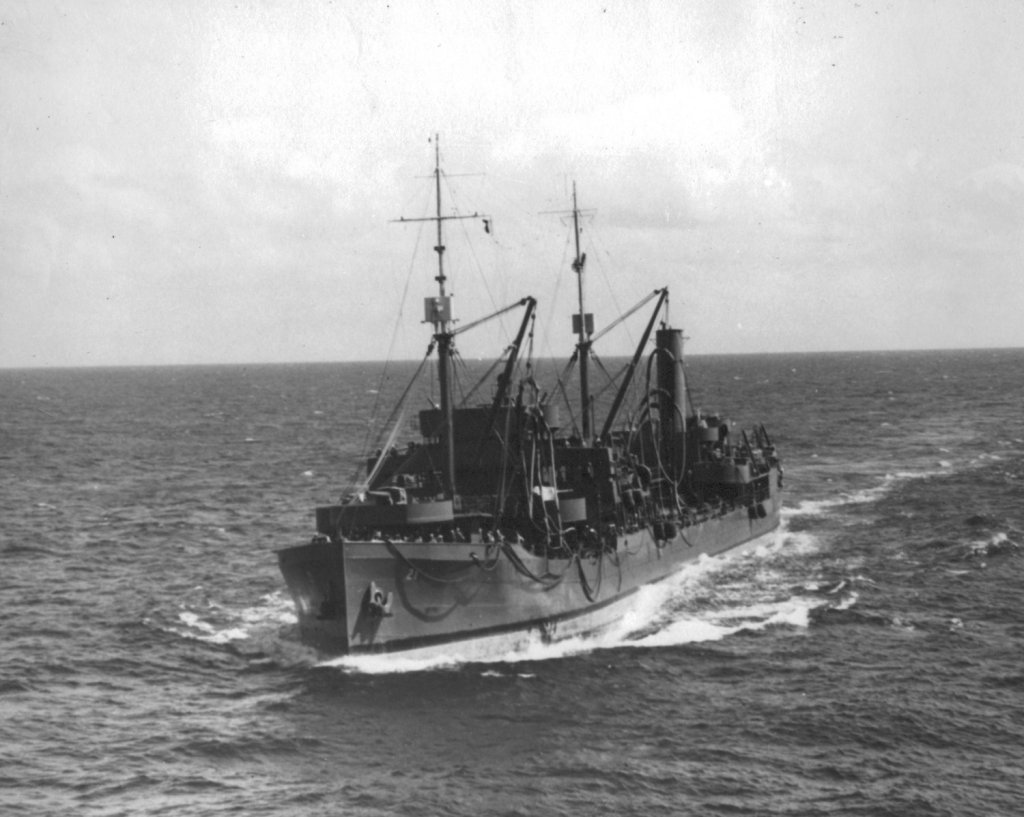
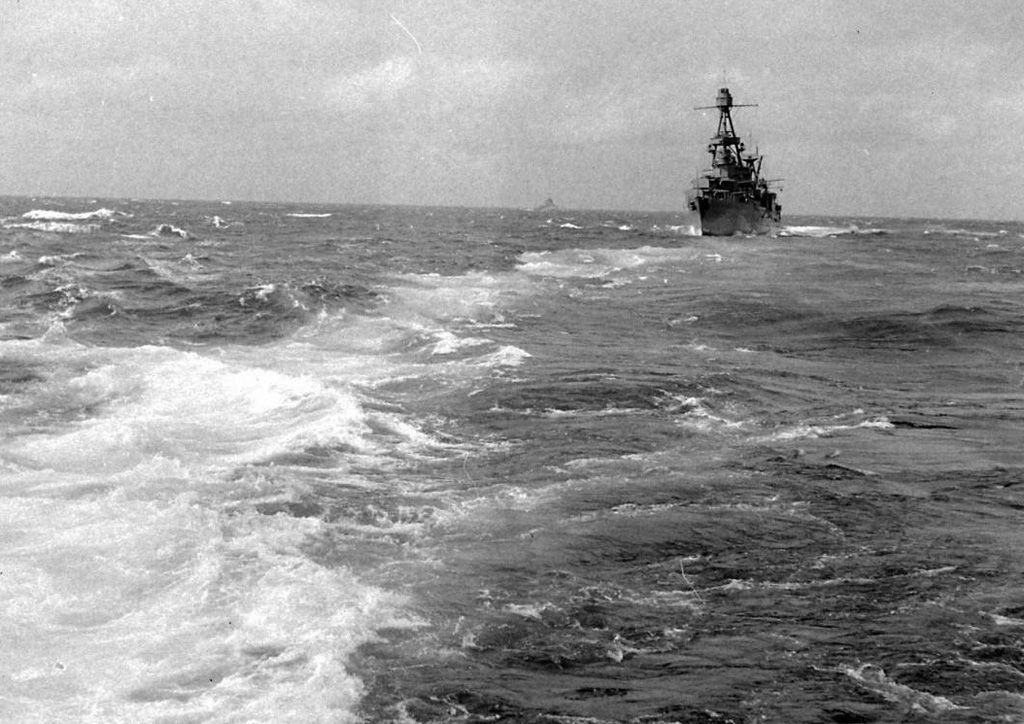
USS Chicago (CA-29) plowing through seas circa June, 1942 (NavSource)
On the morning of May 4, at 0700, Yorktown began launching her aircraft to attack Japanese shipping off Tulagi. TF 17 cruised south of Guadalcanal as Yorktown launched and recovered four attack groups. Chicago steamed as shotgun for Yorktown, but nothing threatened the task force during the raid. After recovering planes of the fourth wave, at 1827 TF 17 assumed a course of 180 to join up again with TF 11.
In the late morning of May 5, the Gun Moll and TF 17 accomplished the rendezvous with Lexington and her consorts of TF 11. She and Perkins were detached from TF 17 and joined TF 44, which was operating with TF 11.
the next morning, May 6, Op Order 2-42 was placed into effect and TF 44 became TF 17.3 in the consolidated carrier task force. In the early afternoon, Chicago headed to USS Neosho for refueling but 30 minutes later was ordered to halt and return to her position. The fuel expended on the rush north to Tulagi would not be replenished before the big battle began, but she would have enough to accomplish her initial assigned tasks the next day.
Around this time the Battle for Corregidor in Manila Bay, Philippines, was culminating after the Japanese amphibious assault late on May 5. The embattled defenders surrendered in the afternoon of May 6. But even as the forces of Imperial Japan experienced this success six months into the Pacific War, their initiative would soon be frustrated, and the Gun Moll would fire every gun she had in order to help achieve that.
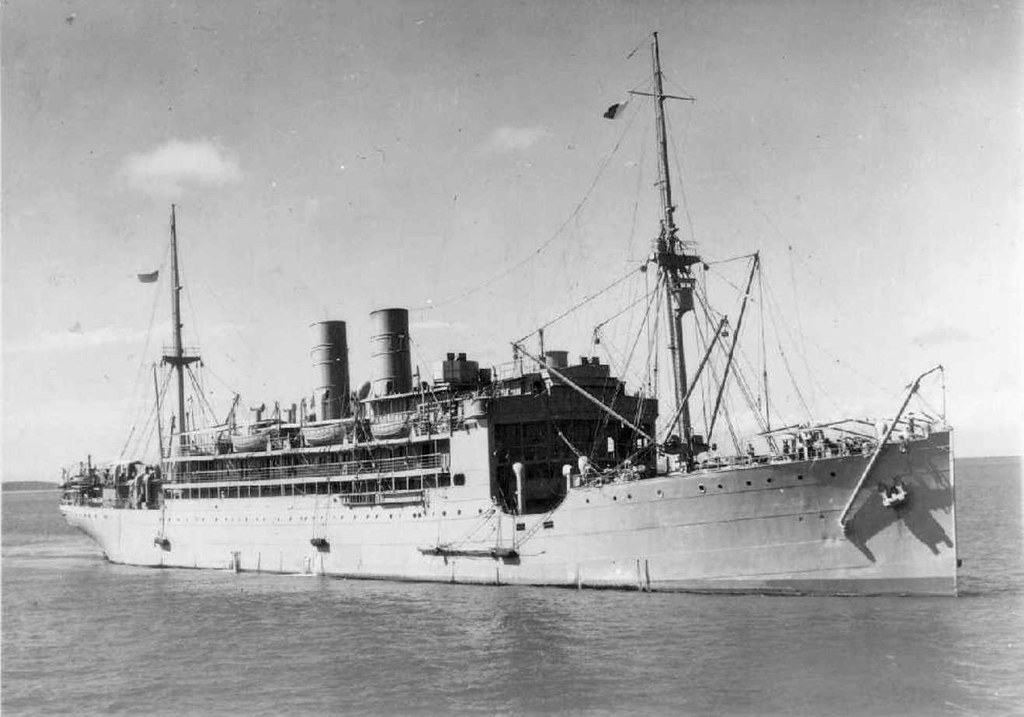
On the morning of 12 Feb 1942, the USS Chicago (CA-29) arrived at Suva, Fiji after a 10-day passage from Pearl Harbor and formally joined the ANZAC Squadron currently assembled there.
Identified quickly by her tall tripod foremast at the mid-background of this picture, US Navy heavy cruiser USS Chicago is shown here at Suva, Fiji, shortly after arrival on February 12, 1942. In the foreground is the camouflaged light cruiser HMNZS Leander. Not the PBY Catalina seaplane on the water in the distance at right. (Reddit.com)
This was the same day her forward-deployed Northampton-class sistership, USS Houston with the ABDA Fleet, was underway at sea northwest of Australia, steaming from Tjilatjap, in the Netherlands East Indies enroute to Darwin, Australia to serve as a convoy escort for Allied forces going to Timor. Chicago would soon perform such an escort duty to the northeast of Australia.
The ANZAC Squadron was commanded by Royal Navy Rear Admiral John G. Crace (ComANZACRon, also known as Flag Officer Commanding ANZAC Squadron (FOCAS)).
Admiral Sir John Gregory Crace (RAN)
Admiral Crace was an Australian by birth who joined the Royal Navy in 1902. He was loaned to the newly-established Royal Australian Navy for four years during the World War I timeframe. His career specialty in naval service was in surface shipborne torpedoes.
He was eventually promoted to Rear Admiral on August 1, 1939 and then appointed as Rear Admiral Commanding the Australian Squadron (RACAS).
When Chicago and escorting destroyer USS Perkins (DD-377) arrived at 0929 that morning, they joined the following major naval combatant organizational scheme in the newly-established ANZACRon under Admiral Crace’s command:
Cruiser Division I, heavy cruisers HMAS Australia and USS Chicago
Cruiser Division II, light cruisers HMNZS Leander and HMNZS Achilles
Division III, destroyers USS Perkins and USS Lamson (DD-367).
In the afternoon, Chicago saw off passengers who were transported to the Area of Operations aboard the cruiser – they were the remaining headquarters staff for Admiral Leary as Commander ANZAC Force (ComANZACFor).
The ANZAC Area in which the ANZAC Force and subordinate ANZAC Squadron operated was established in early 1942, and eventually came under Sout West Pacific Area control when that was established under General MacArthur later in the year. (Wikipedia)
Admiral Leary had flown ahead of Chicago from Pearl Harbor to Auckland, New Zealand to assume command of the ANZAC Area on February 6, 1942. He arrived in Melbourne, Australia to set up his headquarters the same day Chicago arrived at Suva. There at Suva, the newly-arrived staff transferred from Chicago over to HMNZS Monowai, a New Zealand armed merchant cruiser, for movement onward to Melbourne, Australia.
Pic Monowai
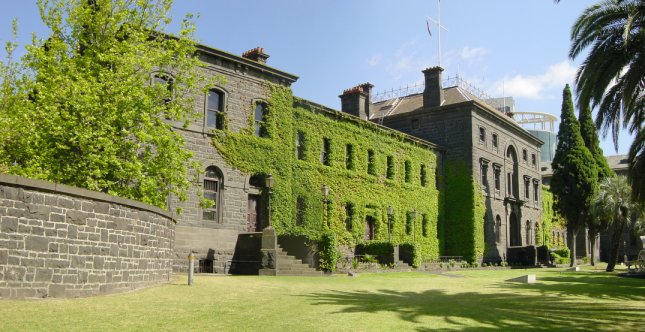
The admiral established his ANZAC Area fleet headquarters ashore at the Navy Office, Victoria Barracks, instead of placing it aboard Chicago in the flag office and staff spaces of the heavy cruiser.
Victoria Barracks in Melbourne, Australia (Oz at War)
Of note, the Australian Government’s War Cabinet was ensconced at Victoria Barracks as well. And in the not-too-distant future, the US Navy Fleet Radio Unit from Corregidor Island in the Philippines would be re-located to the Melbourne area, where it worked with Australian special intelligence units as the FRUMEL organization to provide the senior commanders of the theater with insight on enemy plans and operations.
Chicago also replenished fuel, stores and provisions on arrival day there at Suva. The logistics tail of the ANZAC Squadron was supported by various merchant ships impressed into fleet auxiliary duties, such as the former passenger cargo vessel Merkur, which now served as the victualizing stores and supplies vessel HMAS Merkur.
HMAS Merkut in naval service circa 1942 (Flickr)
This included oilers like the SS Falkejel, which typically serviced other ships in a port/anchorage environment. These were not the equivalent of fleet oilers which could undertake underway replenishment operations which came to be the norm in the Pacific War. US Navy fleet oilers of modern combat speed were few at the time, and priority was given to serving the various carrier task forces. So, the ANZACRon was somewhat handicapped by an oiler tether which affected its range of operations and ability to stay as sea for prolonged periods.
Also, that evening, Chicago received aboard Royal Australian Navy Commander J. Denny for temporary duty as a liaison officer. In coming days, a lot of hard work would be made to ensure the interoperability of US and Commonwealth warships, which would also involve the exchange of ratings in various specialties to help promote communications between the navies. This was important pioneering work which helped ensure the future effective teamwork of Allied naval forces in the Pacific.
It is a credit to Captain Bode of USS Chicago that he was able to work well with Allied naval commanders and forces, perhaps a reflection of his diplomatic experience with naval attache service in Europe before the war. But all did not bode well for the officers and men aboard the formerly happy Chicago as their martinet captain continued to exercise his difficult behavior towards them in the seas of the South Pacific. A red lead painted cry for help would reportedly soon be evidenced reflecting their travail.
Hat Tip to Mr. Peter Dunn of Oz at War for his good help with information on the HQ ANZAC Force.
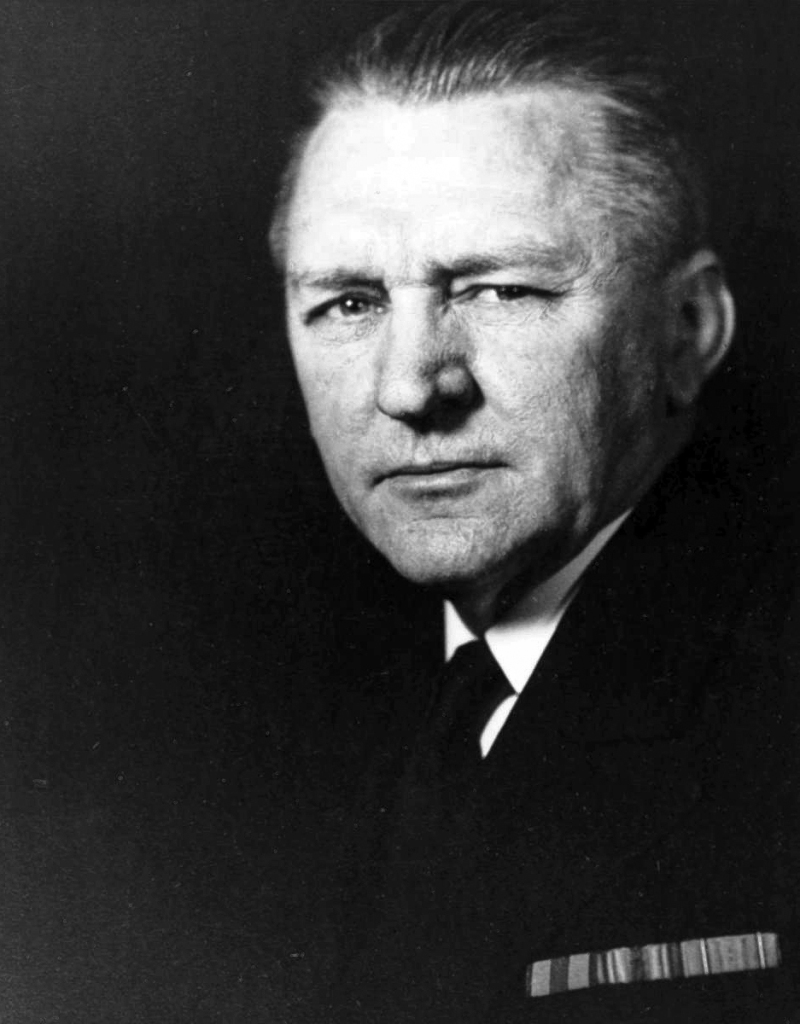
Rear Admiral Herbert F. Leary, USN, erstwhile Commander, Cruisers Battle Force (ComCruBatFor), came aboard Chicago at 1046 hours on January 29, 1942 for duty as the Commander of Task Force 2 (ComTaskFor 2). The admiral would soon be promoted to vice admiral and command of the ANZAC Force.
Vice Admiral Herbert Fairfax Leary, USNA 1905, 1885-1957) became the Commander, ANZAC Force in early 1942)
Leary didn’t linger, as he and some of his staff left the ship the same day, in order to head to the ANZAC area, with the first stop by air to be Wellington, New Zealand.
The ANZAC Area (aka ANZAC Command) was an Allied area of operations to the north and east of Australia which was established by the Allied Combined Chiefs of Staff on January 29, 1942, after the fall of Singapore and Rabaul.
29 2110 JAN 1942 message designating ANZAC Area and force. (Wikipedia)
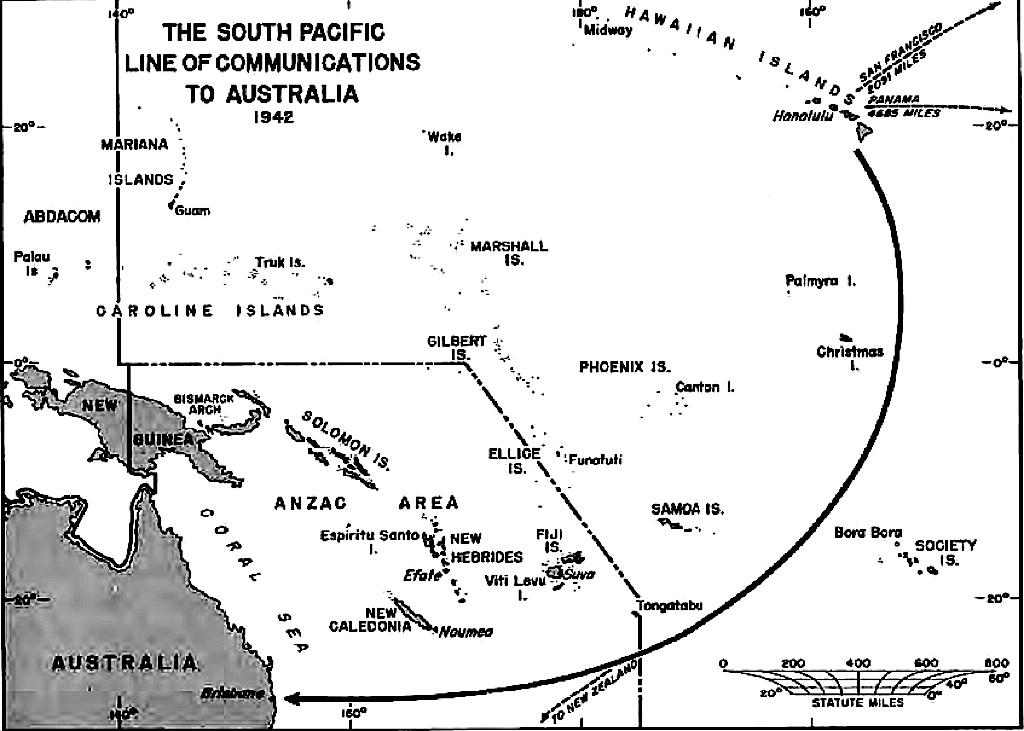
At the same time, the companion American-British-Dutch-Australian (ABDA) Command was already defending the Malay Barrier to the north and west of Australia. The primary purpose of the ANZAC Command was to protect Australia’s northeastern approaches and defend the sea and air lines of communication between Australia and the United States.
ANZAC Area and South Pacific Lines of Communication to Australia 1942 (Wikipedia)
Forces allocated to the ANZAC Command were naval and air, as the command was not made responsible for defense of the Australian landmass. Naval forces originally tasked were the carrier Hermes from Great Britain, the US to provide either a heavy (CA-type) or modern light cruiser (e.g., Brooklyn-class CL) and two destroyers, Australia was to provide two heavy cruisers, a light cruiser, three armed merchant cruisers , two destroyers, two anti-submarine patrol vessels and six corvettes, New Zealand was to provide two light cruisers and an armed merchant cruiser.
As things turned out, the British retained HMS Hermes in the Indian Ocean, along with her 20 Swordfish and Fulmar aircraft. A squadron of USAAF B-17 Flying Fortress heavy bombers, which came to be known as the Kangaroo Squadron, deployed to the South Pacific and operated in the ANZAC area under naval command, first from Fiji and then out of Townsville, Australia.
Being B-17E Flying Fortress heavy bomber of the “Kangaroo Squadron, early 1942. The aircraft later force landed in Papua, New Guinea, and after many years was retrieved and moved to the US, where it is now displayed as the “Swamp Ghost” at the Pearl Harbor Aviation Museum (formerly Pacific Aviation Museum Pearl Harbor) on Ford Island in Pearl Harbor (Oz at War)
With Chicago now under orders to join the ANZAC Force, Captain Bode assumed command of Task Group 2.2, which consisted of USS Chicago (CA-29) and a pair of Mahan-class destroyers, USS Lamson (DD-367) and USS Perkins (DD-377) – Lamson was already in Samoa are on detached duty.
USS Perkins (DD-377) photographed from USS Tangier (AV-8) in a south Pacific harbor, 25 February 1942. Official U.S. Navy Photograph, now in the collections of the National Archives. Photo #: 80-G-266837 (NavSource)
Chicago was perhaps chosen as she was built as a fleet flagship and offered suitable flag officer and staff facilities for use by Admiral Leary, as seen in her days as the flagship for the Commander, Cruisers, Scouting Force. Leary, however, emulating the former Pacific Fleet Commander Admiral Husband Kimmel, decided the best way to command and control his area of operations was not from a flagship but from a headquarters ashore. That way the flagship’s position would not be compromised by the necessary radio communications needed to exercise command and control naval forces.
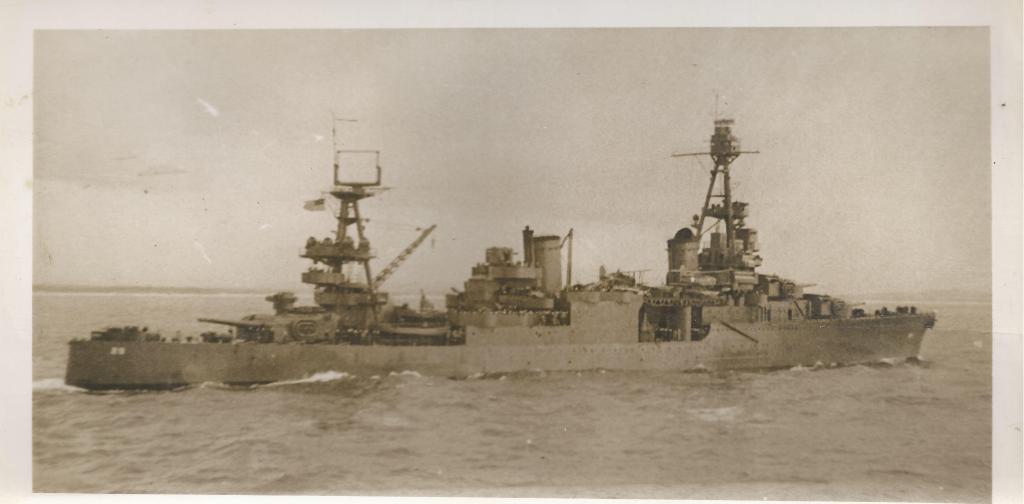
USS Chicago (CA-29) underway early in the war in the Pacific, as part of Task Force 12 (NavSource)
On February 2, the American contingent of the ANZAC naval squadron, TG 2.2, got underway from Pearl Harbor at 1059 hours and proceeded to join the ANZAC Squadron of the ANZAC Force in the ANZAC area of operations.
Task Force 11 (TF 11), centered on aircraft carrier USS Lexington (CV-2), returned to Pearl Harbor on January 16, 1942 after a fruitless patrol of the Oahu – Johnston – Midway triangle. It was Chicago’s fourth wartime patrol with the Lexington’s task force.
Heavy cruiser USS Chicago (CA-29), foreground, flagship of the Commander, Cruisers, Scouting Force, sails as part of the screen for aircraft carrier USS Lexington (CV-2, background, center-right) in the timeframe of the Pearl Harbor attack. Chicago would make five war patrols with the Lexington’s task force in December 1941 and January 1942. A censor has blotted out the CXAM radars atop Chicago’s mainmast and Lexington’s smokestack. (NavSource)
During the patrol, which began on January 7, one of the few things of note in Chicago’s war diary was the promotion of the commander of the cruisers in TF 11 (ComCruTask For 11), who had embarked aboard Chicago in early January after the departure of the Commander, Cruisers, Scouting Force. In accordance with authorization by the President, Captain William W. “Poco” Smith, to the rank of Rear Admiral, USN, on January 10. Chicago served as his flagship commanding the cruisers of the task force, including Chicago and USS Indianapolis (CA-35) on this war patrol.
Captain William W. “Poco” Smith, USN (USNA 1909) in 1941 became a famed commander of cruisers in the early battles of the Pacific War including Coral Sea and Midway with TF 17. During the balance of the war he served as Director of the Naval Transportation Serive. he ultimately was promoted to the rank of Vice Admiral and retired in 1949. (Wikipedia)
On January 17, Captain Bernard H. Bieri, Sr., the heavy cruiser’s last peacetime commander and first wartime commander, was relieved of command of Chicago and his Annapolis classmate, Captain Howard D. Bode (rhymes with toady) assumed command.
Captain Bernard Henry Bieri, Sr., USN (USNA 1911), later served on Admiral King’s staff and played a role in naval operations in Europe, including D-Day and ultimately attained the rank of Vice Admiral and retired in 1951. (USNI.org)
Few realized what a change this made for the crew of Chicago, though a few had heard rumors about the new captain from old Asiatic Fleet hands. And the rumors weren’t good. And the rumors were all too soon confirmed to be true. The previously known “happy ship” that Chicago was would be transformed into a ship where the crew tread lightly over decks covered in eggshells under the Captain Bligh-like rule of an ”unreasonable martinet.”
Captain Howard Douglas Bode, USN (USNA 1911), circa 1941. His wartime experience did not go well. (Uboat.net)
Douglas Howard Bode was born in Cincinnati, Ohio, on January 23, 1889. He attended the Woodward High School and the Walnut Hill Preparatory School before entering the US Naval Academy, from which he graduated in the class of 1911, ranked 181 out of 193 midshipmen. The USNA Yearbook contained this description of him:
“BEHOLD the Count — serene but rhino, graced with a bewitching smile and an exceedingly blasé air. A quiet, neat, and unassuming fellow, who dotes on plebes, and had reason to regret the failing. Turns in early on hop-nights, except on unusual occasions when he gives the ladies a treat by stagging. Every one of these special occasions is really his “last appearance.” He is haunted every now and then by visions of Pilsner, sauerkraut, zwiebeck, and the U.S.N.A. suffers terribly by comparison. Is a past-master of the art of sarcasm, and generally keeps the crowd in good humor while he is around. Smokes some kind of a dried plant for a cigar that absolutely couldn’t let an O.C. lose him. “Now look here.” “
He acquired other nicknames in addition to Count, such as Boad and later Ping, the last apparently named after a professional big league baseball player with a similar name, Ping Bodie, an outfielder who played for the Chicago White Sox and NY Yankees between 1911 and 1921.
Bode went on to serve in the peacetime navy, including command of the submarine USS K-7 in the World War One-era and the destroyer tender USS Black Hawk (AD-9) in the Asiatic Fleet (13 Aug 1935 – 14 Feb 1936). Before the US entry into World War II, he served in naval intelligence, both in Europe and in Washington D.C. and had some role in the assessment of intelligence on Japanese activity in the Pacific, including the “Bomb Plot” message of September 24, 1941, related to Japanese intelligence collection on Pearl Harbor. He apparently advocated passing the information on the Admiral Kimmel at Pearl Harbor but this was vetoed by the head of ONI, the irascible Admiral Richmond Kelly Turner. Bode may have run into conflict with Turner on the handling of this intelligence, which could have resulted in his reassignment a short time later back to the fleet in command of a battleship, a plum assignment in the Navy, and a stepping stone to flag officer rank.
Captain Bode He assumed command of the battleship USS Oklahoma (BB-37) on October 31, 1941, just weeks before the Japanese attack on Hawaii. Bode was not aboard his ship when the Pearl Harbor attack began, having left at 0730 to go aboard adjacent battleship USS Maryland (BB-46) for either a staff meeting or Sunday services, depending on the source.
In any event, he was a bystander as Oklahoma was hit by multiple torpedoes and ignominiously capsized. Oklahoma had poor internal watertight integrity just then, as many hatches had been opened in preparation for Capt Bode’s formal inspection of his ship, which allowed water entering from the torpedo hits to flow much more quickly and extensively, toppling the battleship in 12 minutes and taking over 400 over her crew with her.
Capsized OK. The Oklahoma (BB-37) starts to capsize. The ship had no watertight integrity, as all portholes and watertight doors were open for Captain’s inspection when the Japanese attacked. Maryland (BB-46) is at left, and Tennessee (BB-43) is behind and to the left of the Oklahoma, and West Virginia (BB-48) is directly behind her and sinking. (NavSource)
Eager to command again, he was given Chicago and true to form, he began to use his authority to make a difficult command climate for the crew. It wasn’t long before many Chicagomen wished he had gone down with Oklahoma instead of coming to Chicago.
But at the start of Captain Bode’s sea command tour of duty aboard Chicago, it was back to business as usual as a heavy cruiser in TF 11 for her fifth wartime patrol. On January 19, the task force got underway again after taking on fuel, stores and provisions. Lexington, with three heavy cruisers Chicago, Minneapolis (CA-36) and Astoria (CA-34) and nine destroyers Phelps, Mugford, Bagley, Dale, Jarvis, Worden, Hull, MacDonough and Monaghan, departed Pearl Harbor at 1140 on an offensive patrol to the northeast of the Kingman Reef (just northwest of Palmyra Atoll) – Christmas Island (Kiritimati Island today) line.
Map of Oceania showing operations of US Navy carrier task forces in late January, 1942 (Map via Pinterest)
Here TF 11 would be prepared to defend this area and be in a position to render support to TF 6 (aircraft carrier USS Enterprise (CV-6) and escorting ships) and TF 17 (carrier USS Yorktown (CV-5) and escorting ships) if needed. Yorktown escorted a troop convoy to American Samoa, and on January 25 TF 6 and TF 17 joined up and headed northwestward for raids on the Marshall Islands and Gilbert Islands, respectively. These two raids were successfully accomplished on February 1, 1942.
With the successful reinforcement of Pago Pago, American Samoa and the linkup of the two carrier task forces, TF 11 was deemed to have fulfilled its patrol mission and returned to Pearl Harbor on January 25 at 1209. There the ships again fueled, stored and provisioned.
For Chicago, however, an upgrade in armament was planned, and on January 30 she moved to the Pearl Harbor Navy Yard at 1255 that day for the installation of four quadruple-barrel 1.1-inch anti-aircraft guns. These weapons replaced the single 3-inch anti-aircraft guns in four positions.
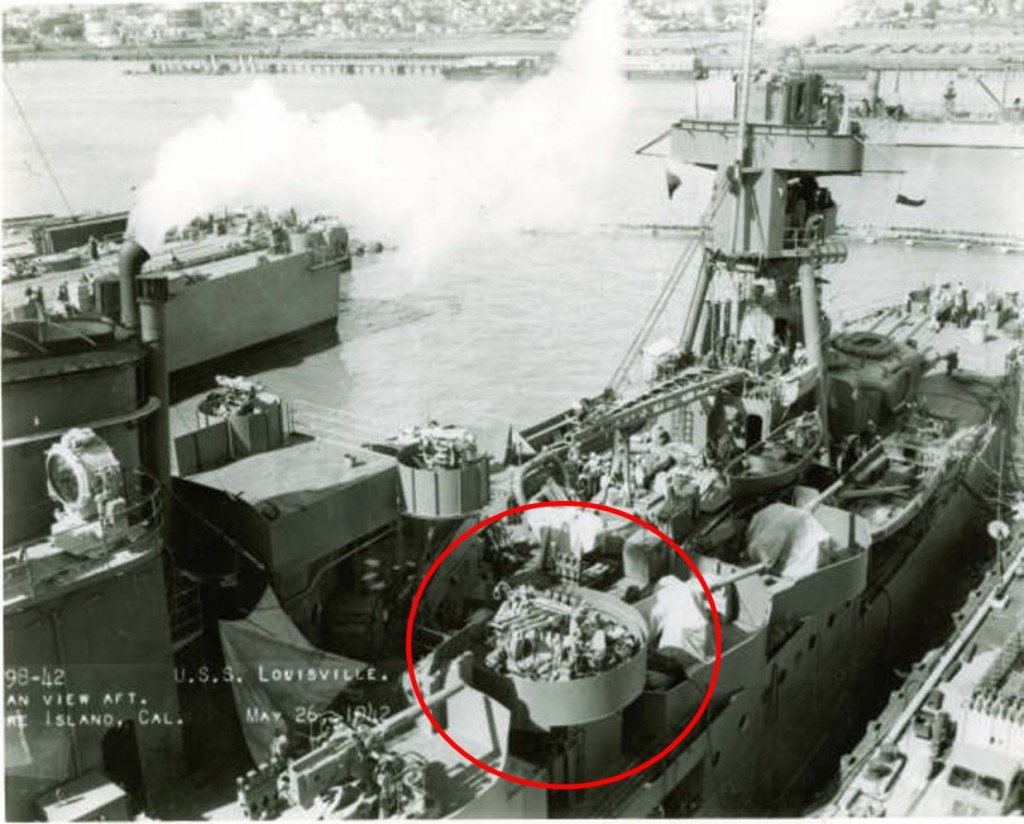
The port after 1.1-inch quadruple anti-aircraft gun mount on Chicago’s sister-ship USS Louisville (CA-27) is seen here circled in red, nestled in between the 5-inch/25-caliber guns of her secondary battery. Chicago’s 1.1-inch gun mounts were in the same positions as her other sisters in the Northampton-class of heavy cruisers. (NavSource)
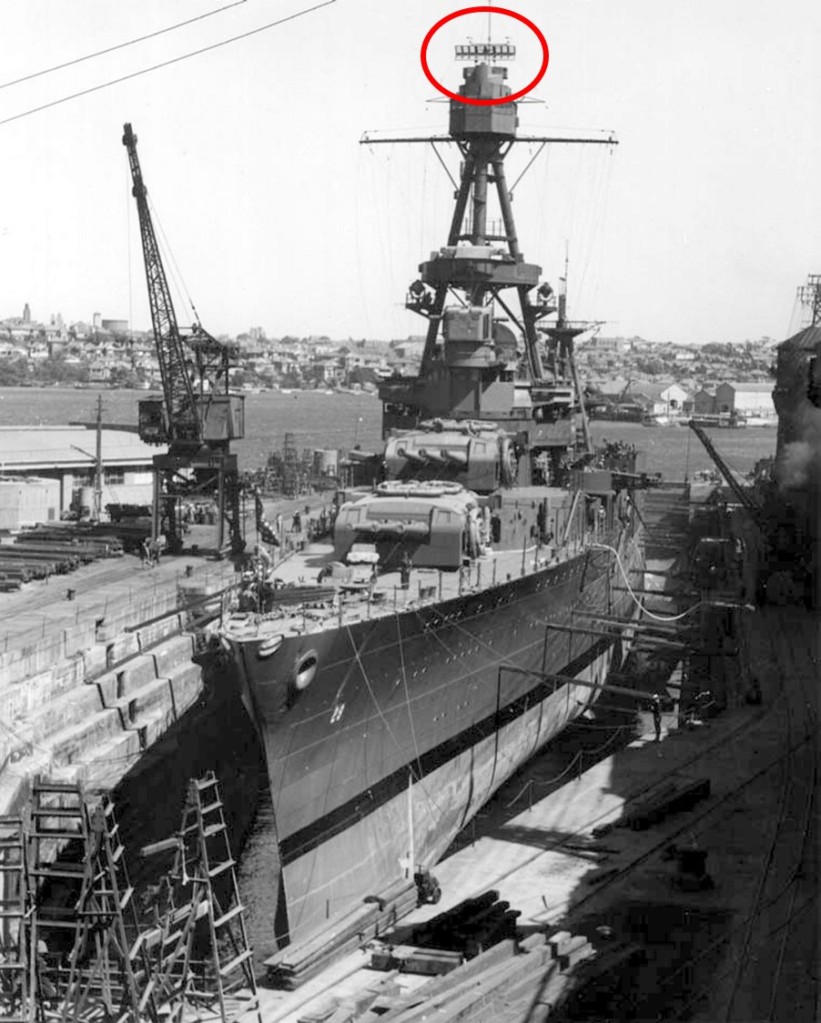
The brief refit also equipped her with a fire control radar for her main battery of 8-inch guns. A single FC-type Mark 3 fire control radar was mounted atop the main battery director situated up on the foremast, with a distinctive rectangular bedspring look. (See circled antenna in picture below)
USS Chicago (CA-29, is seen here under repair in the Sutherland drydock, Cockatoo Island Dockyard, Sydney, Australia, showing temporary repairs made to the bow between August 29 and 20 September 20, 1942 after her battle damage at the Battle of Savo Island, August 9, 1942. She subsequently sailed for the Mare Island Navy Yard for permanent repairs and refit. In this view, the Mark 3 FC fire control radar atop her foremast is circled in red. National Archives, San Francisco Branch, Mare Island Naval Shipyard General Correspondence files, 1941-47 (NavSource)
And with this, at 1530, now Rear Admiral W. W. “Poco” Smith transferred his flag from Chicago to the heavy cruiser Astoria for continued duty as ComCruTaskFor 11.
Two days before the Pearl Harbor attack a carrier-cruiser group built around USS Lexington (CV-2) departed Pearl to deliver reinforcement aircraft to Midway. This is USS Astoria (CA-34) underway at sea, as seen from USS Portland (CA-33). She operated with TF 12 from 5 to 13 Dec 1941. Photographer Robert Landry, Life Magazine, used for educational and non-commercial purpose. (NavSource)
For Chicago, as January, 1942 ended, so did her role as part of Task Force 11 riding shotgun for carrier Lexington on five war patrols. She would soon set sail for the South Pacific, and duty as the American cruiser portion of the new Allied ANZAC* Squadron to defend the seaward approaches to eastern Australia and New Zealand.
*ANZAC is a term which heralds back to the World War One-era Australia-New Zealand Army Corps (ANZAC) which served in the Mediterranean and the Western Front.
For the US Navy heavy cruiser USS Chicago (CA-29) 80 years ago, the new year wasn’t necessarily a happy one. Everywhere in the Pacific, US forces faced defeat in combat against the forces of Imperial Japan. The Japanese juggernaut seemed unstoppable.
The heavy cruiser USS Chicago (CA-29) was the initial flagship of Task Force 12 (TF 12), centered on aircraft carrier Lexington (CV-2) from December 5-7, 1941, with TF commander Rear Admiral John H. Newton and staff embarked (the command element of Cruisers, Scouting Force (ComCruScoFor)). Chicago is seen here with signal flags flying in line ahead of USS Portland (CA-33) from which this picture was taken, during the early war period December 8-13, 1941. TF 12 was redesignated TF 11 on December 14, 1941. (NavSource, USS Portland (CA-33) page, Photographer Robert Landry, Life Magazine)
Coming off the sting of participation in the failed effort to relieve the beleaguered Marines on Wake Island, Chicago and Task Force 11 (TF 11), centered around aircraft carrier Lexington (CV-2), returned to Pearl Harbor on the morning of December 27, 1941. There the ships replenished fuel, stores and provisions for the next sortie. Chicagomen turned to in accordance with (IAW) CinCPac orders of December 12 to strip Pacific Fleet ships of “All items of material not essential to military efficiency…”
Task Force 11 didn’t linger long, and two days later, on the morning of December 29, Chicago and the rest of TF 11 stood out of Pearl for an offensive patrol in the Oahu – Johnston – Palmyra triangle “in order to prevent possible Japanese raids.”
At left is heavy cruiser USS Chicago (CA-29) in line astern of USS Indianapolis (CA-35), the new flagship of Task Force 12 with Vice Admiral Wilson Brown Jr. embarked (the command element of the Scouting Force (ComScoFor)), as of December 8, 1941, as seen from USS Portland (CA-33). A wartime censor has blotted out the CXAM radar antenna atop Chicago’s mainmast. This picture was taken sometime between December 8, when Indianapolis joined TF 12 and Admiral Brown took command, and December 13, 1941. (NavSource, USS Indianapolis (CA-35) page, Photographer Robert Landry, Life Magazine)
In fact, on the day this mission began, Chicago fired her guns in wartime anger for the first time in the late afternoon when lookouts spotted what appeared to be an object in the water. Submarine fever perhaps took hold of US forces early in the war, but better safe than sorry. Gunners fired four rounds of 3-inch/50-caliber ammunition at the object, after which a destroyer in the screen dropped depth charges.
Chicago was slated to receive four quadruple 1.1-inch anti-aircraft guns as part of an anti-aircraft (AA) armament upgrade planned before the war, but as the war began she was still equipped with four single 3-inch guns as part of her AA weaponry. The gun could fire a 13-lb explosive shell from a 24-lb complete round at 15-20 rounds per minute out to about seven nautical miles at 43-degrees elevation. It had a reach of up to 30,000 feet in altitude at maximum elevation, 85 degrees.
A pair of 3-inch/50-caliber (76.2 mm) dual-purpose (anti-air and anti-surface) guns are seen here in target practice aboard light cruiser USS Milwaukee (CL-5) in December, 1928. USS Chicago had four of these weapons installed in four individual shielded gun tubs (one gun in each tub) circa 1940, pending equipping with four quadruple 1.1-inch anti-aircraft guns. (NavWeaps.com, U.S. Naval Historical Center Photograph # NH 64614)
Fate intervened, however, for Chicago, and for TF11. On December 30 the heavy cruiser was ordered to detach from TF 11 and return to Pearl Harbor for a change of command for the Commander, Cruisers Scouting Force (ComCruScoFor). Chicago and destroyer Hull as escort left the formation in the late morning, and arrived at Pearl Harbor in the 0900 hour on December 31.
Now at war, and no time to waste, a change of command took place at 1100, per CinCPac orders. ComCruScoFor and ComCruDiv 4 Rear Admiral John H. Newton, USN, was relieved by Rear Admiral Frank J. Fletcher, USN.
Vice Admiral John H. Newton, USN, is shown at Noumea, New Caledonia, in 1943. He commanded the Cruisers, Scouting Force and Cruiser Division 4 from February to December, 1941 from his flagship, USS Chicago (CA-29), and was responsible for the operations of the Scouting Force’s twelve heavy cruisers in three divisions, approximately fifteen destroyers and three aircraft squadrons. (Wikipedia)
Both admirals officially left Chicago at 1423 in order to participate in the CinCPac change of command, with Admiral Chester W. Nimitz, USN taking command of the US Pacific Fleet in a ceremony held aboard the submarine USS Grayling (SS-209).
Admiral Chester W. Nimitz, USN, Commander in Chief, U.S. Pacific Fleet, (right center), addresses senior officers at Pearl Harbor, 31 December 1941, the day he took command. Photographed in front of the Torpedo Building at Quarry Point. Standing at right is Rear Admiral Husband E. Kimmel, who had held the command until 17 December. (Ibiblio.org/hyperwar)
Neither Newton nor Fletcher returned to Chicago – Admiral Newton was reassigned to the Office of the Chief of Naval Operations, working as the Sub-Chief of Naval Operations for CNO Admiral Ernest J. King. Admiral Fletcher moved on to command Task Force 17 centered on the aircraft carrier USS Yorktown (CV-5) which had just transferred back to the Pacific from the Atlantic.
Rear Admiral Frank Jack Fletcher took command of the Cruisers, Scouting Force on December 31, 1941, but was only aboard Chicago for a brief period that day. He left to take command of Task Force 17, centered on aircraft carrier USS Yorktown (CV-5) and became a successful, if not widely appreciated, combat commander in 1942 in the battles of the Coral Sea, Midway and Eastern Solomons. He is seen here as a Vice Admiral in September, 1942. (Thoughtco.com)
Chicago’s ten-year run as flagship for the cruisers of the Scouting Force ended in the rearranged command and control structure for US Navy fleet operations in World War II. With the loss or damage to the battleships of the Battle Force on December 7, the new task force structure, tested in prewar exercises with an aircraft carrier as the centerpiece, now gained prominence, and the peacetime distinctions between Battle Force and Scouting Force blurred.
For TF 11, the triangle patrol at the turn of the year saw no contact with enemy forces and the ships returned to Pearl Harbor on the afternoon of January 3. Neither TF 11 nor Chicago, now admiral-less, lingered long at Pearl Harbor, as CinCPac orders sent them out to the triangle again on the morning of January 7, 1942. It was a patrol that would have been historic, but for the trouble caused by an IJN submarine, but that is another story…
References
War Diary, USS Chicago 12/7/1941 – 4/30/1942
War Diary, USS Indianapolis, 12/7/1941 – 4/30/1942
Christmas, 1936, 85-years ago today, aboard the United States Ship Chicago (CA-29) was celebrated at Long Beach, California.
The dinner for the officers and men of this heavy cruiser that day was ample, considering the nation was still in the throes of the Great Depression.
In fact, sailors aboard were grateful that they had enough to eat, as compared to the hardscrabble existence some had experienced before they joined the Navy. And some of those even managed to help out less-well-to-do relatives ashore in that difficult time.
Hat tip to Mrs. Joy Neal Kidney, author of “Leora’s Letters: The Story of Love and Loss for an Iowa Family During World War II,” for sharing the Christmas menu via her LinkedIn post. “Leora’s Letters” tells a family story including two brothers who joined the Navy during the great Depression, Delbert and Donald Wilson of Dexter, Iowa, who were Chicagomen in the 1930s.
Today is Memorial Day here in the United States, a day to honor our fallen Soldiers, Marines, Sailors, Airmen and Coast Guardsmen who died in service to our country. We can give thanks and appreciate the sacrifice they made.
It adds an even greater impact when allies and friends honor our war dead, many of whom fell in battle with our friends and allies fighting a common foe. For the United States and Australia, this common bond goes back to the First World War, and was repeated again in the Second World War and since then in places like Korea, Vietnam and the deserts of Southwest Asia.
Earlier this month, at a Battle of the Coral Sea remembrance in Cardwell, Queensland, Australia, citizens there dedicated a plaque at the Coral Sea Battle Memorial Park in honor of the participation of USS Chicago in the battle and the two crewmen she lost to enemy action.
USS Chicago (CA-29) as seen at the time of the Guadalcanal landings, August 1942. Her configuration was similar at the Battle of the Coral Sea in May, 1942 with the exception of 20mm anti-aircraft guns added to replace .50-caliber machine guns in a brief refit at Cockatoo Island, Sydney after the Coral Sea battle. (Flickr)
On May 7, 1942, Chicago was part of the Support Group, the former ANZAC Squadron designated Task Force 44, but on temporary duty in Task Force 17 (TF 17, centered on carrier Yorktown (CV-5), flagship of Read Admiral Frank Jack Fletcher). Chicago and the rest of TF 44 was administratively assigned to Task Group 17.3, called the Support Group, commanded by Rear Admiral John G. Crace, Royal Navy.
Admiral John G. Crace, Royal Navy but of Australian origin, commanded the Support Group, which included USS Chicago, during the Battle of the Coral Sea (Royal Australian Navy)
Early on May 7, the Commander of TF 17 directed the Support Group, commanded by RAdm Crace aboard heavy cruiser HMAS Australia (D.84), to take his ships and establish a blocking position at the exit of the Jomard Passage against any Japanese attempt to advance its invasion force toward the strategic objective of Port Moresby in eastern New Guinea. Along with Chicago and Australia were light cruiser HMAS Hobart (D.63) and three US Navy destroyers, USS Farragut (DD-348), USS Perkins (DD-377) and USS Walke (DD-416).
Enroute to their blocking position, Japanese search aircraft detected the Support Group and reported back to their headquarters. A formation of Imperial Japanese Navy land-based “Rikko” (land attack planes) in the form of torpedo bombers (Mitsubishi G4M Type 1) and land-based horizontal bombers (Mitsubishi G3M Type 96) were directed to attack the ships and did so. In the process the Allied ships dodged all the torpedoes aimed at them, as well as the bombs dropped on them, and shot down several of the low-flying torpedo planes. USS Chicago was strafed by six enemy aircraft which approached to within 70 to 100 yards of the ship and some of her crewmen were wounded, two fatally. Several of the low-level attackers were shot down.
Mitsubishi G4M Type 1 “Rikko” torpedo bombers (later codenamed BETTY) pass between ships of the Support Group during the Battle of the Coral Sea, May 7, 1942. The aircraft in the center is seen above HMAS Australia, flagship of the Support Group. US Navy destroyer USS Walke is seen at left, background. Photo taken from aboard HMAS Hobart. (Australian War Memorial)
Seaman First Class (S1c) Anthony B. Shirley Jr., service number 295 72 33, entered the service from Georgia and enlisted in the US Navy on August 7, 1940 at Nashville, Tennessee. Shirley was killed when hit in the head by shrapnel from gunfire and died while at his battle station as a gun pointer on anti-aircraft gun No. 5 during the enemy torpedo-bomber attack. Shirley was buried at sea on May 8 and is remembered on the Walls of the Missing at the Manila American Cemetery in the Philippines. S1c Shirley was awarded the Purple Heart for his sacrifice.
Baker Third Class (Bkr3c) Robert E. Reilly, service number 223 79 84, entered the service from New York and enlisted in the U.S. Navy at New York City on August 15, 1940. Reilly was mortally wounded by gunfire to the head during an enemy torpedo-bomber attack on his ship while at his battle station (probably as a lookout) up on the searchlight platform on the mainmast. Reilly died from his wounds the next day and was buried at sea the same day, May 8. He is remembered on the Walls of the Missing at the Manila American Cemetery in the Philippines. Bkr3c Reilly was awarded the Purple Heart for his sacrifice.
Fast forward to 2019, and discussion between the author of this web log and citizens in Cardwell, Australia, who upkeep the Coral Sea Battle Memorial Park. The existing plaque dedicated to USS Chicago at the park was nice, but didn’t mention the names of the two Chicagomen lost in the battle. The remarks were kindly received, and before long citizens there proposed a new plaque to show the names of the fallen sailors.
Final draft of the new USS Chicago memorial plaque, pictured below at the dedication ceremony on May 2, 2021
Further coordination and discussion took place between Cardwell citizens, represented by Ms. Anne Mealing, and the USS Chicago Reunion Association, president Donald Elliot. This cooperation, communication and coordination led to finalization of a design, production of it, a Covid-deferred ceremony in 2020 and then with patience and persistence in May, 2021, a dedication of the plaque in the Coral Sea Battle Memorial Park as part of the annual observance of the battle anniversary.
The Coral Sea Battle Memorial Park in Cardwell, Queensland, Australia as seen on the day of the Coral Sea Battle Commemoration and dedication of the new USS Chicago memorial plaque, May 2, 2021 (via Ms. Anne Mealing)
Although Covid constraints and less than optimum weather may have affected attendance this year, the good news is commemoration organizers were rewarded with a successful event as 200 attendees enjoyed the observation and the dedication of the new USS Chicago plaque.
New memorial plaque for USS Chicago in the Coral Sea Battle Memorial Park, Cardwell, Queensland, Australia, dedicated on May 2, 2021 (via Ms. Anne Mealing)
Distinguished guests included the US Naval Attaché CAPT Matthew Ort, Commanding Officer HMAS Cairns Commander Glenn Williams and Councillor and Mrs. Mark Nolan, Mayor of Cassowary Coast Regional Council.
Left to right, Ms. Noelene Byrne, US Naval Attache CAPT Matthew Ort, Ms. Anne Mealing and CO HMAS Cairns, Commander Glenn Williams (via Ms. Anne Mealing)
Chaplain Russell Smith, RAN, said a prayer at the unveiling of the plaque.
Chaplain Russell Smith saying a prayer at the unveiling of the plaque (via Ms. Anne Mealing)
And citizens presented wreaths in honor of the fallen from all the ships and units represented in the park. For next year’s observation, the largest Cardwell CSB Memorial Park event yet is planned.
So, it is with a heartfelt appreciation of an ally and friend that USS Chicago-related personnel remember the ship’s fallen this year, and the new memorial plaque in honor of Anthony B. Shirley, Jr. and Robert E. Reilly at the Battle of the Coral Sea. Thank you, Australian shipmates!